A music app I made with a friend in less than 6 hours.
TuneScore is an educational app that allows a user to play displayed notes using an instrument and see if they were correct with what they played. The app utilizes the Tuna library to be able to determine what note is being played based on microphone input.
Working with a friend
This project was a class project for my friend Joelle McDonald. She enlisted my help due to my previous experience with iOS development. She laid out the requirements for the app as well as the designs for the iconography and other assets while I wrote the logic in Swift while using SwiftUI for the layout engine.
TuneScore supports a variety of different instruments and allows users to adjust whether they want to see questions with flat or sharp notes. They can also customize whether to see questions with the treble or bass clef and the max number of ledger lines a question can display.
Potential Future Features
If I were to add features going forward to this app I would consider adding the following:
The ability for the device to play the correct note.
A higher or lower feedback system to help the user.
How to play a particular note on a specific instrument.
For our final project, we were given the choice to choose a material of our choice and create a thing with it.
Brainstorming
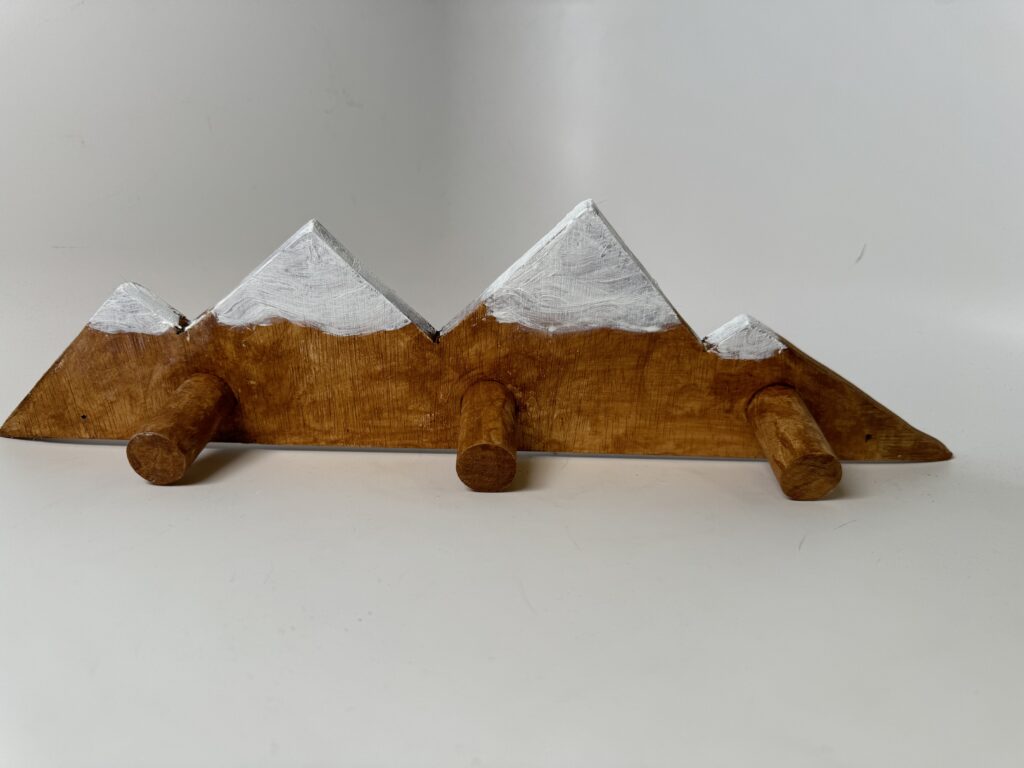
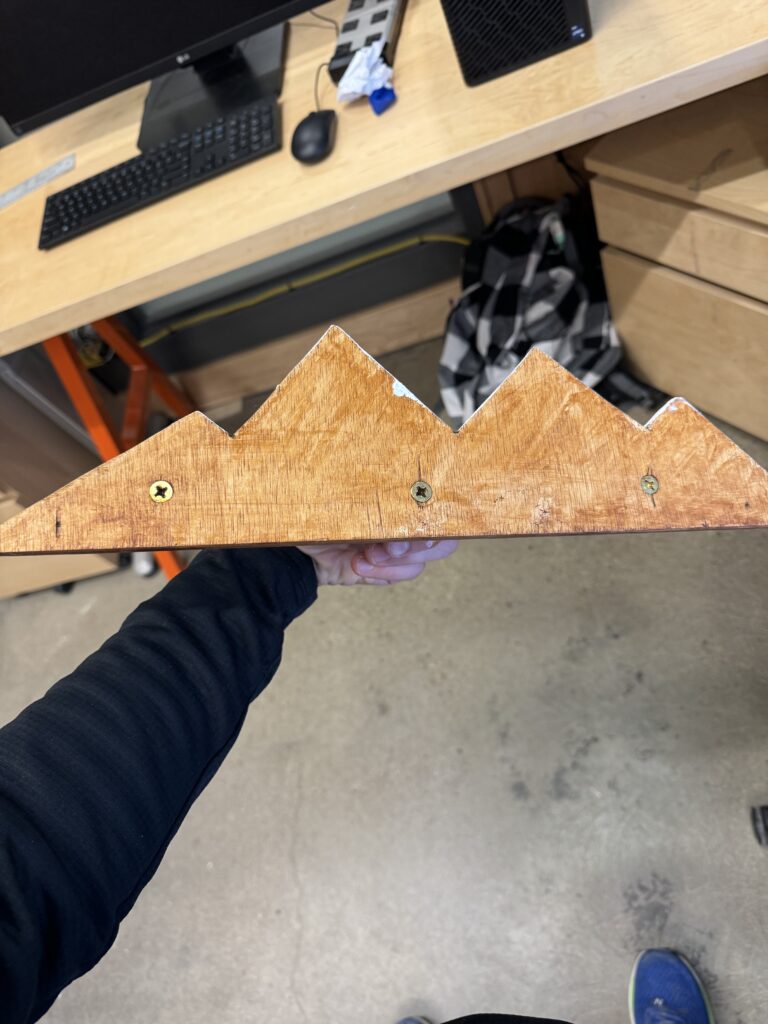
During the brainstorming process, I struggled to figure out what I should do. Possible ideas revolved around Christmas gifts for others, electronic wooden blocks, and useful items such as a laundry basket for the men’s track locker room. While many of these ideas were great, they were relatively complex or large and would have required a significant amount of time to complete. With a suggestion from my mom, I Googled some beginner woodworking projects and came across a guide for a mountain shaped coat/key hanger. I chose to use wood for its ease of cutting and the texture for this project (also because the project specified using wood). I specifically chose to use plywood due to the texture of it and the fact that it was one of the thicker pieces available in the BTU. Plywood is usually primarily made of a bunch of slabs of spruce, pine and fir glued together and is sometimes known as SPF wood. It is very affordable and is used for many applications such as walls, roofing, and sheds.
The wooden mountain coat hanger by Ana White is a simple wooden item made through cutting out wood in the shape of mountains, attaching dowels, and painting the wood to resemble the beautiful mountains of Colorado.
Starting the climb
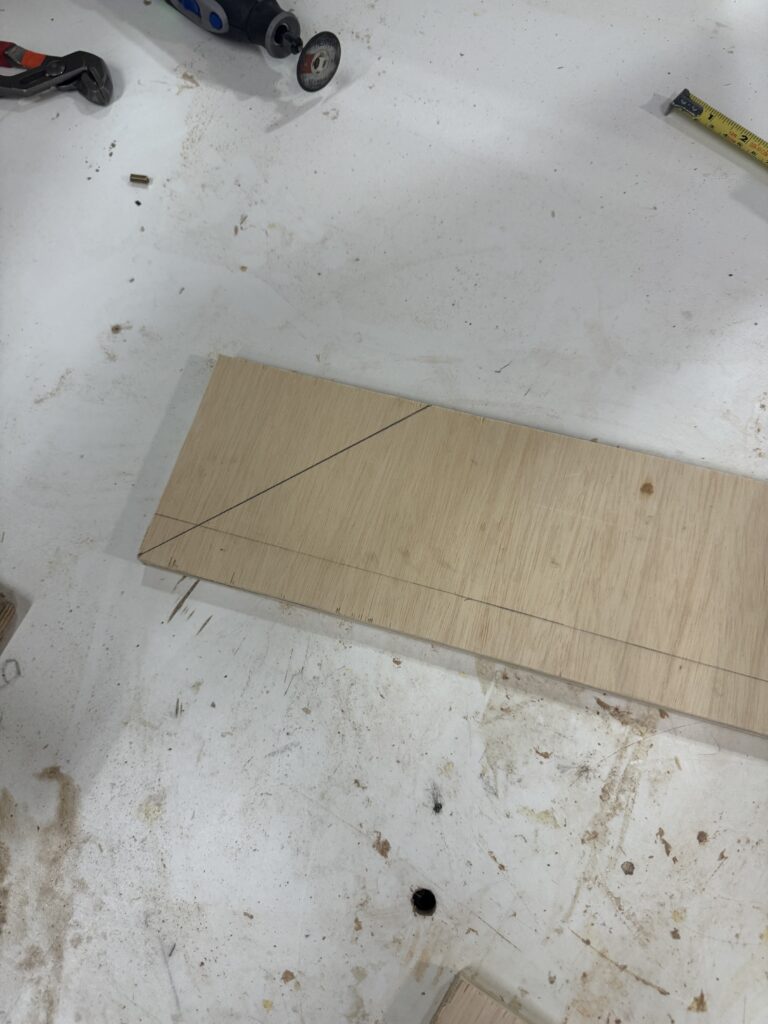
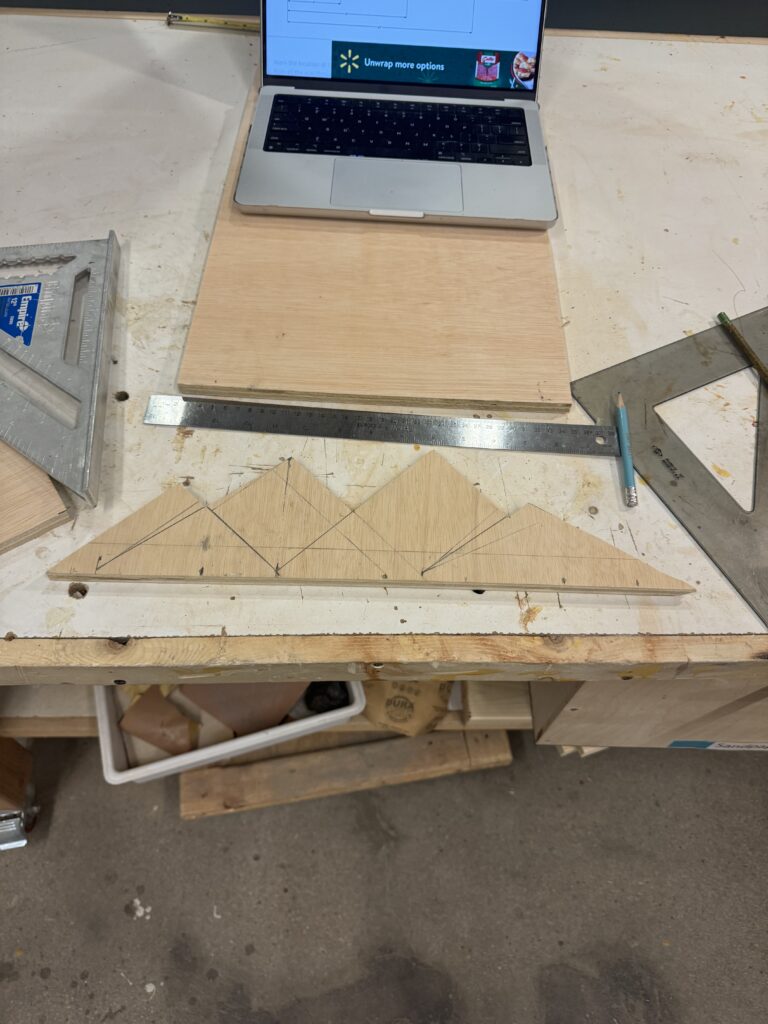
I first obtained a piece of plywood wood and used the table saw to cut it to the specified dimensions in the guide. I disregarded the thickness of the wood and only made sure that the piece I used seemed thick enough to hold 3 coats. Next I drew cut lines using a ruler and a construction square so I could cut the mountain shapes. I struggled to make the measurements for the lines exactly as specified in the instructions due to a lack of angle measurements for the triangle shaped mountains. Nevertheless, I ensured that the heights of the mountains relative to one another were the same as in the instructions. I used the band saw to make the cut on the wood lines. I then used the power sander to sand off some of my imperfections.
The guide specified that I should use a 3/8 drill bit to create the screw holes for attaching the dowels. I thought this was unusually large for a screw hole especially because the instructions specified using a miter to drill a hole for the dowels. I could not find any miters in the BTU lab, but I decided that I could probably avoid using miters since the 3/8th hole was quite large. I used the drill press to make 3 holes of 3/8th in diameter in the piece.
Pitstop at McGuckins
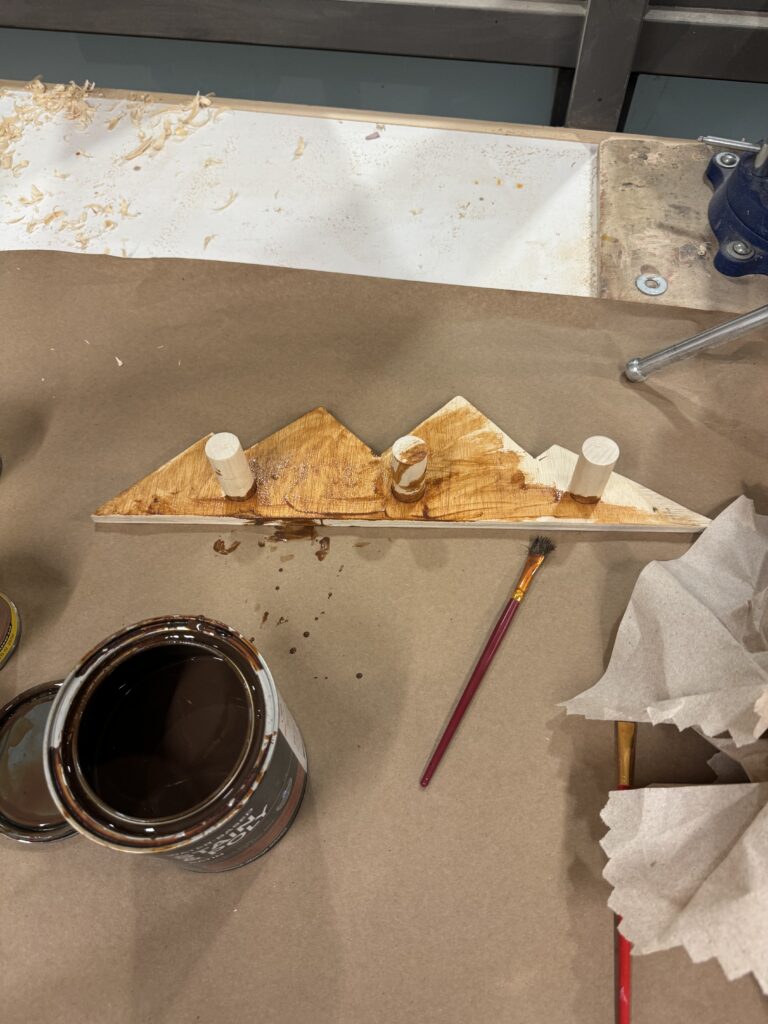
I then journeyed to McGuckin’s Hardware to buy some dowels and screws to attach the dowels to the piece. I purchased 3 brass screws of 1 1/2 inches in length and 1/4 inches in diameter. I also purchased a large dowel for me to cut that was an inch in diameter.
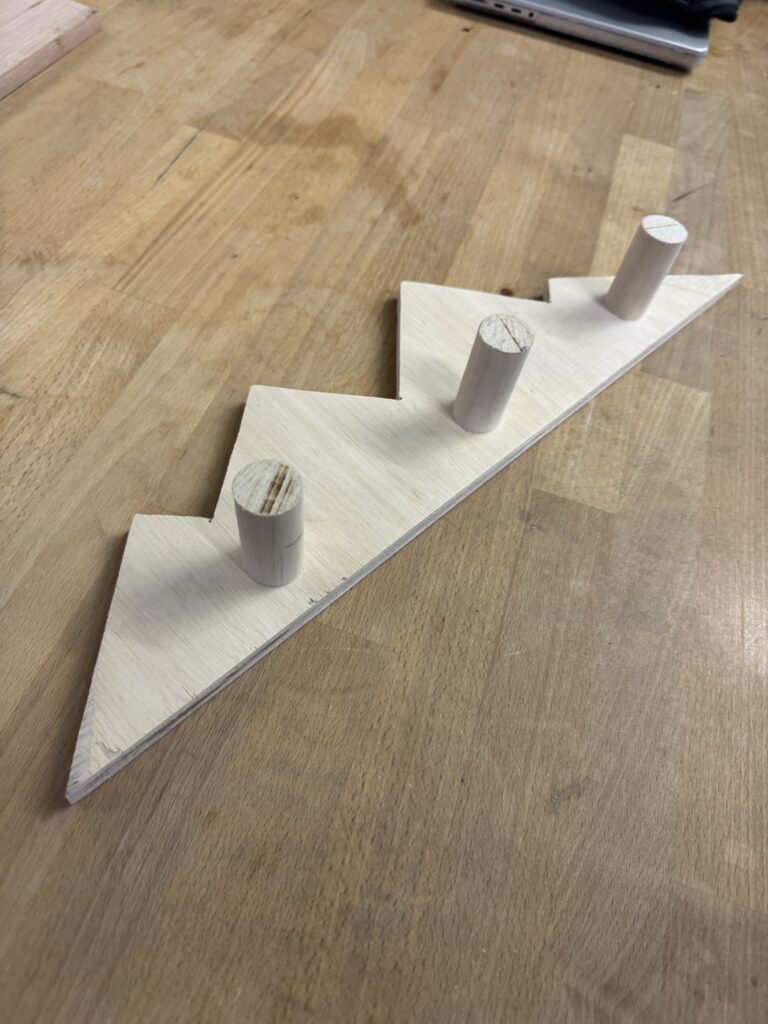
Assembling the hanger.
To cut the dowels, I marked them for 2 inches in length with a pencil. I tried using the table saw. Unfortunately, this launched my newly cut dowels backwards like Angry Birds multiple times causing some fragments in the cut. I decided to recut the dowels using the band saw for a much better and less deadly experience. To attach the dowels, I used a power drill and a bit that was smaller than the screw’s diameter to drill straight down to help guide the screws in. I then used the power drill with a screw head to screw and connect the dowel and the mountain shaped base together. It took me a couple tries of removing and reinserting the screws to get them to go straight down but I eventually was successful. I then used a very small drill bit to cut two more holes in the piece for nails to be used to attach the finished piece to a wall.
Finishing up
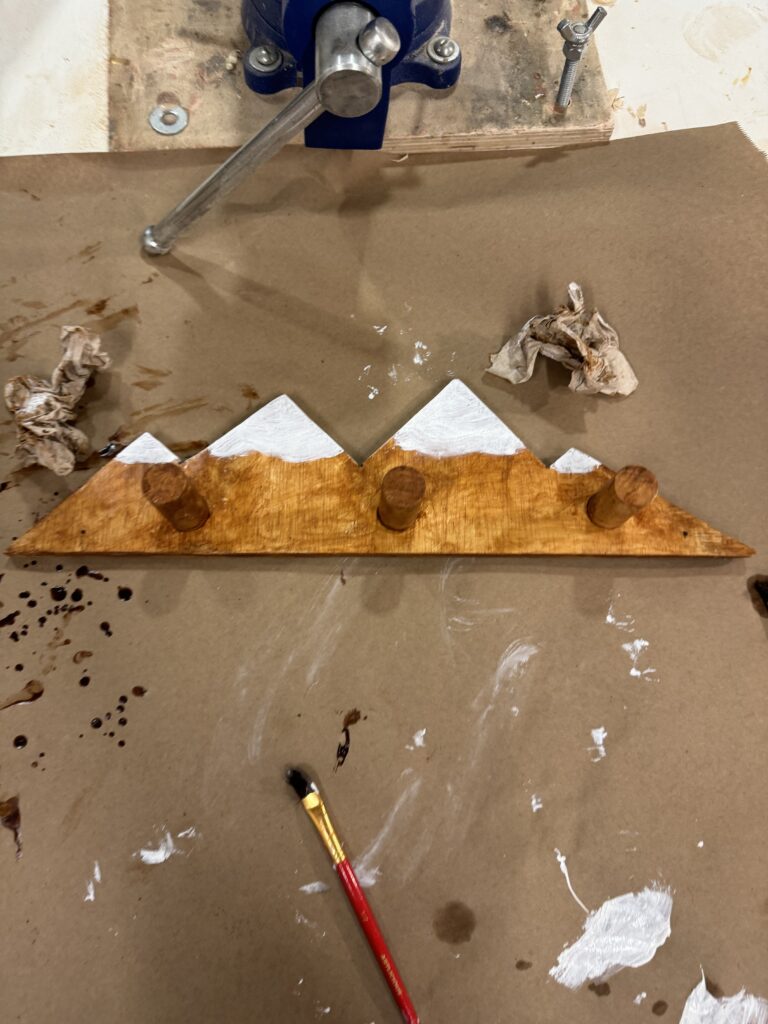
My final step was to apply a finish to the wood as well as paint the wood. I used a brown finish from the BTU lab to coat the item. While I could have applied a second coat to get the darker texture advertised on the bucket of finish, I thought the light brown looked good. I then used white paint to paint the snow on top of the mountain.
For this project, we are tasked with liking an item out of the type of metal. For my project, I chose a funny sounding metal sheet when you shake it, also known as galvanized steel. I was originally thinking about making a cube.
“Squaring up with the project. “
To make a cube, I thought I should start with cutting a square from my steel sheet. I attempted to use used the metal shears to cut the sheet into a square but quickly found that it was difficult to cut in a straight line using these tools. I then tried using the jigsaw to cut the square and had more success. However, I quickly realized that to make a cube I would have needed to cut a net rather than a 2D square. I decided I would start over.
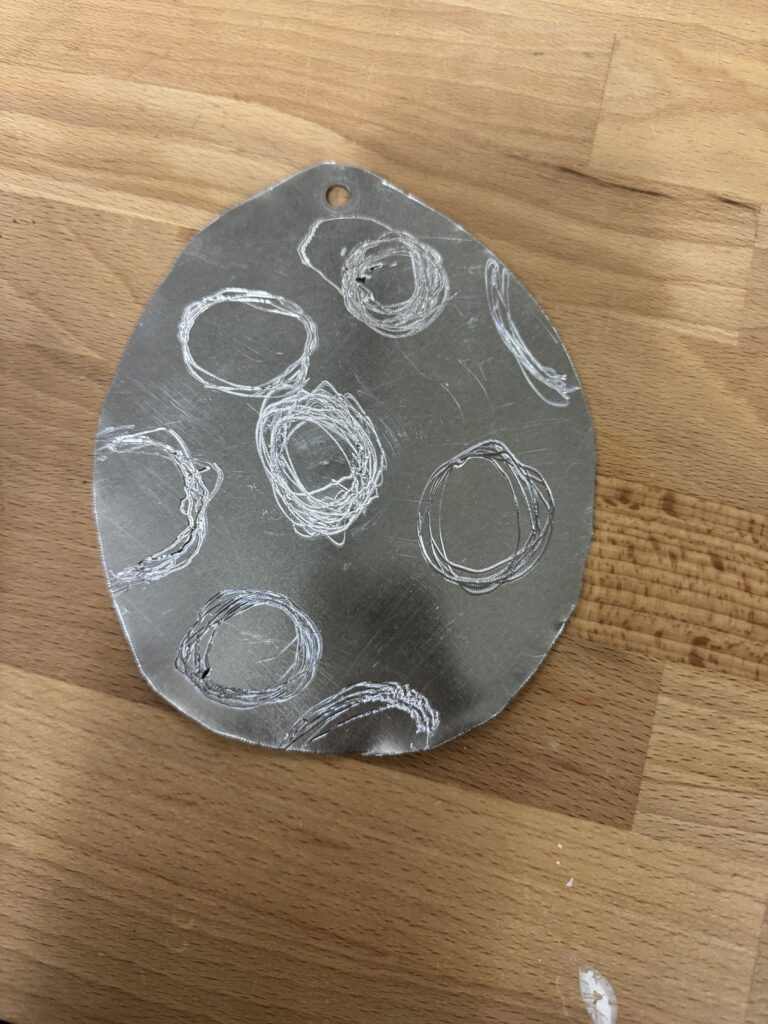
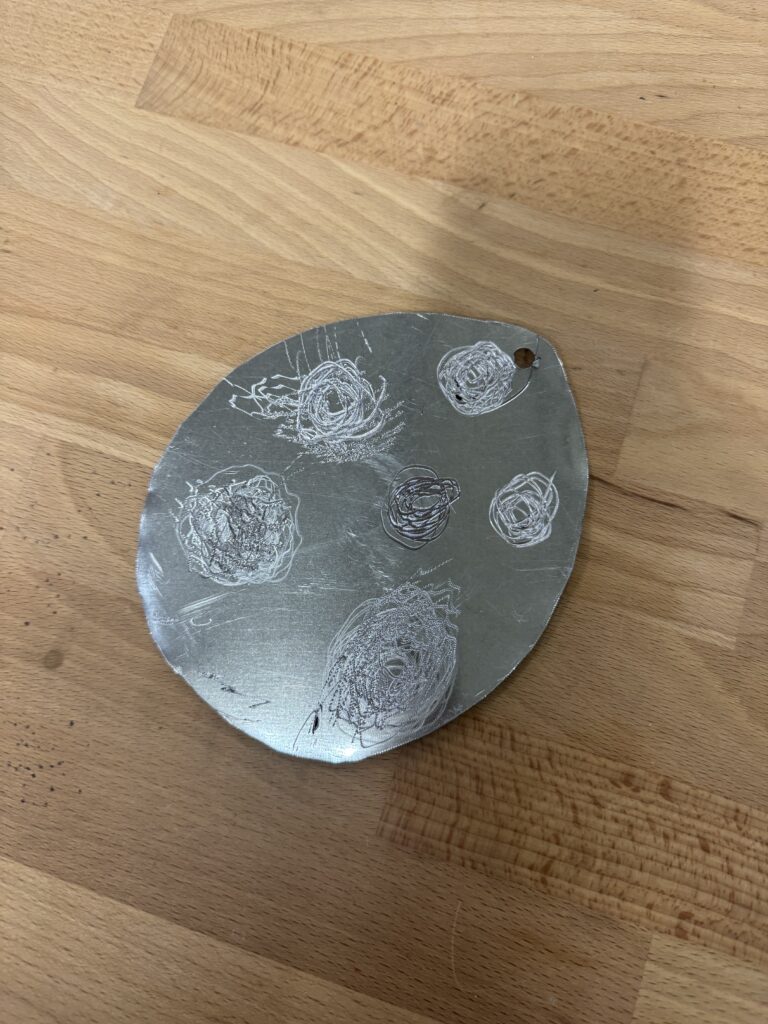
Egging the project
I started with a fresh sheet of galvanized steel unsure of what I should make. I started with cutting a circle using the shears expecting to have an idea strike me. Unfortunately, I wasn’t able to make a perfect circle instead I was left with a 2D egg shape. That’s when I was struck with “a bolt of brilliance”. I was gonna make a Yoshi egg ornament.
Finishing up
Yoshi eggs have spots on them so I took the metal dremel and drew large circles on both sides of the egg. The first side, I made the circles by drawing lots of little circles to fill in the spots due to me having little control over the precision of my movements. The next side was better looking as I took an approach where I drew only a few circles on the outside while holding the dremel like a pen which gave it a cleaner look. Finally, I used the drill press to create a hole in the tip of the egg to allow the egg to be hung from a tree.
For this project, we were tasked with creating a cement structure that can hold water.
Finding a “concrete” idea
I struggled to find a good idea for my project. At first I thought it would be cool if I could create a water fountain of some sort that would utilize a pump to cycle the water. Unfortunately, making such a device would require a mold, piping, and other steps that would significantly complicate the project. I also considered making a cement shoe copy of one of my old New Balance 880 shoes. Because I had regionals for cross country in Texas during our work time I decided I would make a simple bowl instead due to time constraints. This would allow me to complete the project quickly and without making a mold.
Getting the materials.
To make the cement bowl, I took two plastic bowls from the CU Athletic Department. The first bowl was a white plastic bowl commonly used for cereal or yogurt while the black bowl is usually used for pasta or salad.
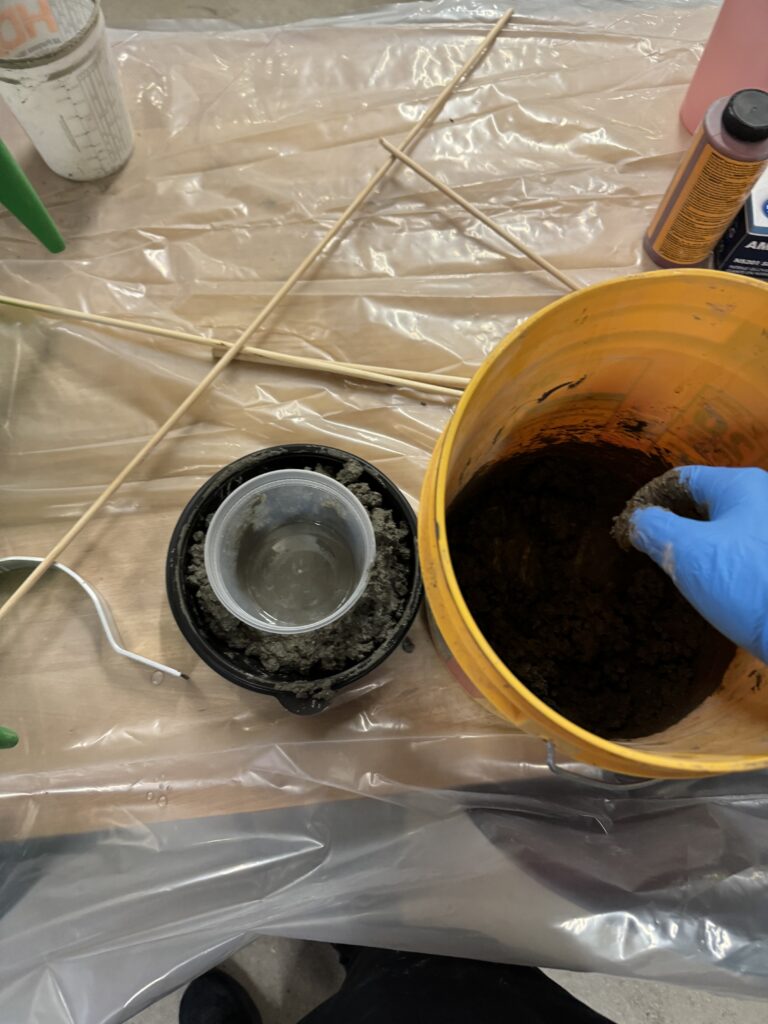
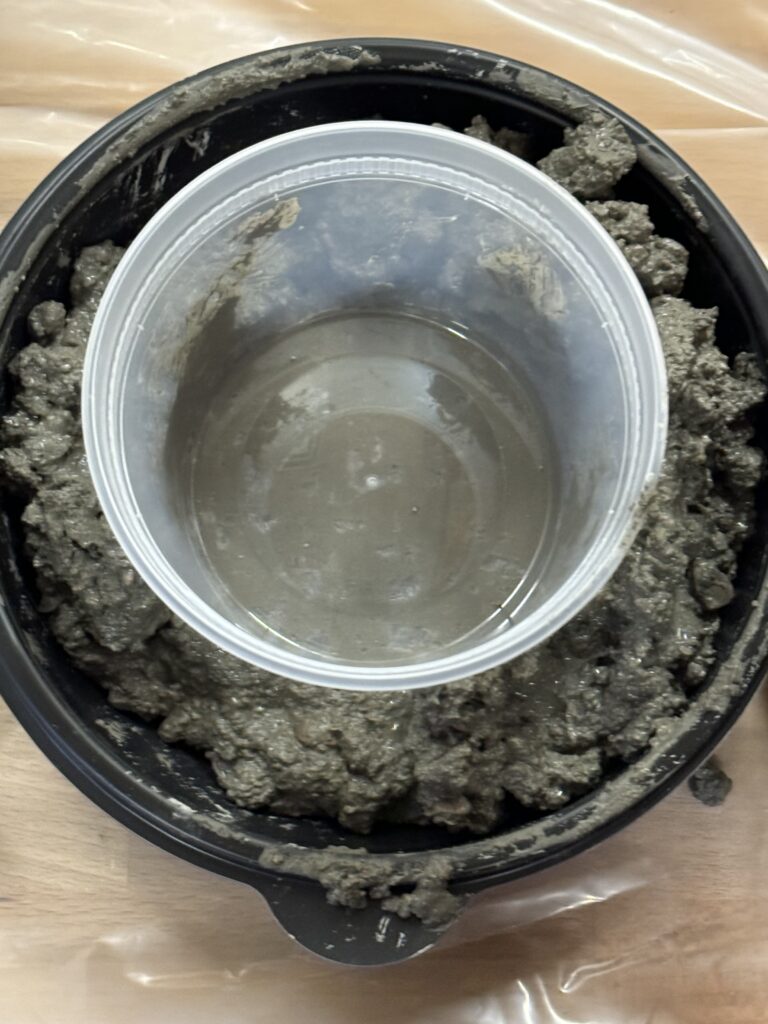
Mixing the concrete
I decided to use quick set concrete to make my bowl. Retroactively, I might have wanted to use the other type of concrete that has a smoother finish. I added water to the concrete mix and mixed it until it was a sort of cookie dough like texture and filled a small layer in the bottom of the black bowl so it would be able to hold water.
After making a small layer to act as a base, I placed the white bowl in the center of the black bowl and began to fill around the white bowl with concrete.
Next I let it sit for a few days while I left to compete in Texas.
I arrived at the BTU lab to find that my concrete abomination was solid and ready to be separated from the plastic bowls. I was able to pull out the white bowl by squeezing it. For the black bowl, I had to use scissors to cut the bowl apart and off of the cement base.
The final product had a very rough texture on the top of the bowl. If I had more time to periodically smooth it during the curing process I might have been able to get the top to be more smooth. The product also left lots of cement crumbs.
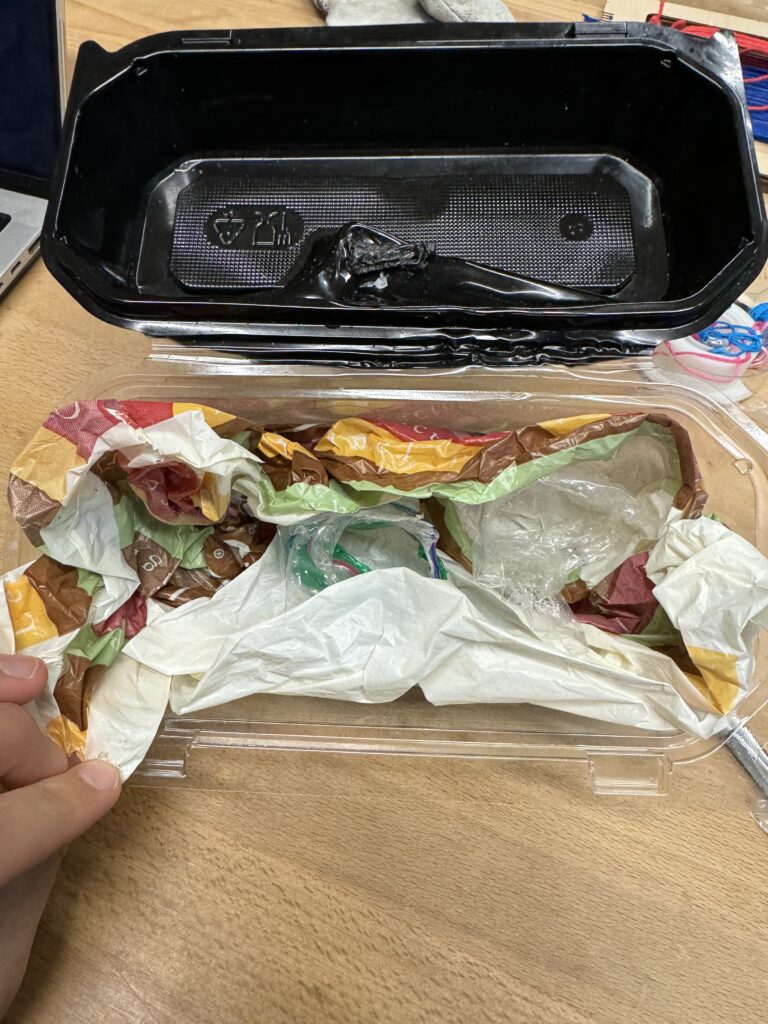
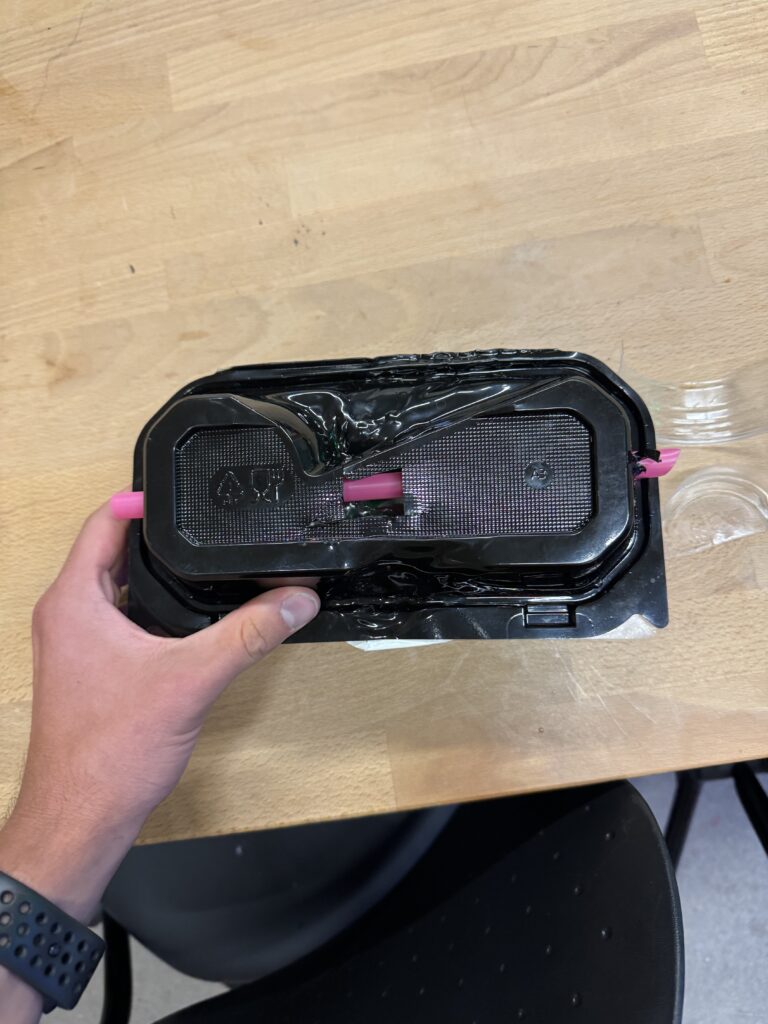
For project 3, we were tasked with designing a gondola out of recycled plastics for carrying 3 eggs down a ramp with the goal of either all of the eggs surviving or being destroyed.
Cooking up the base with some waste
The Cheesecake Factory container and various other plastics from the restaurant.
My first step was collecting plastic materials to create the gondola. I decided to use a (PET) plastic Cheesecake Factory cake to-go container to make the base of the Gondola to carry the eggs. I chose this container due to its ability to close with a locking mechanism that seemed to not open even if it was carrying a significant amount of weight. Because the container was oddly shaped in the black portion, I decided to use the clear portion as the part that actually holds the eggs. Next, I used a plastic bag (HDPE) and also from the Cheesecake Factory to act as a shock absorber for the eggs on the floor of the gondola and the edges.
Zip-locking the eggs into place.
I wanted to ensure that the eggs did not move from their position and bump into each other during motion so I needed a way to secure them in place. I decided I would try to create a sort of “seat belt” to hold them in place by using a plastic (LDPE) zip-loc bag I found in the garbage in the BTU lab. As we were encouraged not to use tape, I tore the plastic bag into 3 roughly equal parts and for each part, used a heat gun to melt the plastic pieces into rings to go around each of the eggs. To secure the rings to the gondola, I melted a small piece of each ring and stuck it to the plastic bag in the base of the gondola.
“Hooking” up the straw
I needed to create a way for the hook to be able to connect to the gondola on the test day. I utilized a straw from the ATLAS Cafe to put through the container (I cut holes in both sides of the container for the straw). The friction of the straw seemed to be strong enough to prevent it from easily coming out so I did not bother with melting more plastic to stick it. To be able to connect the hook, I cut a small square in the top of the container directly above the straw.
Walking on eggshells
Due to team travel for the final Cross Country Pac-12 Championships ever, I was not in class for the launch day of our gondolas. I did however FaceTime in to watch my gondola get launched. Unfortunately all of my eggs broke. While I could not get a very good look at the setup as well as how the eggs were placed in the container, I wasn’t expecting the line to end with a solid wall that my gondola would hit. I thought the line would end with a stop near the hook causing the gondola to swing rather than slam into something. This slamming action seemed to cause the container to open and everything to spill out with all 3 of my eggs broken. If I had known this prior I think I would have designed a sort of cushion to slow the impact of the entire gondola to. I could have done this potentially by inflating a plastic bag and connecting it to the impact side of the gondola. I also might have wanted to reinforce the locking mechanism to ensure that there was no way the case would open.
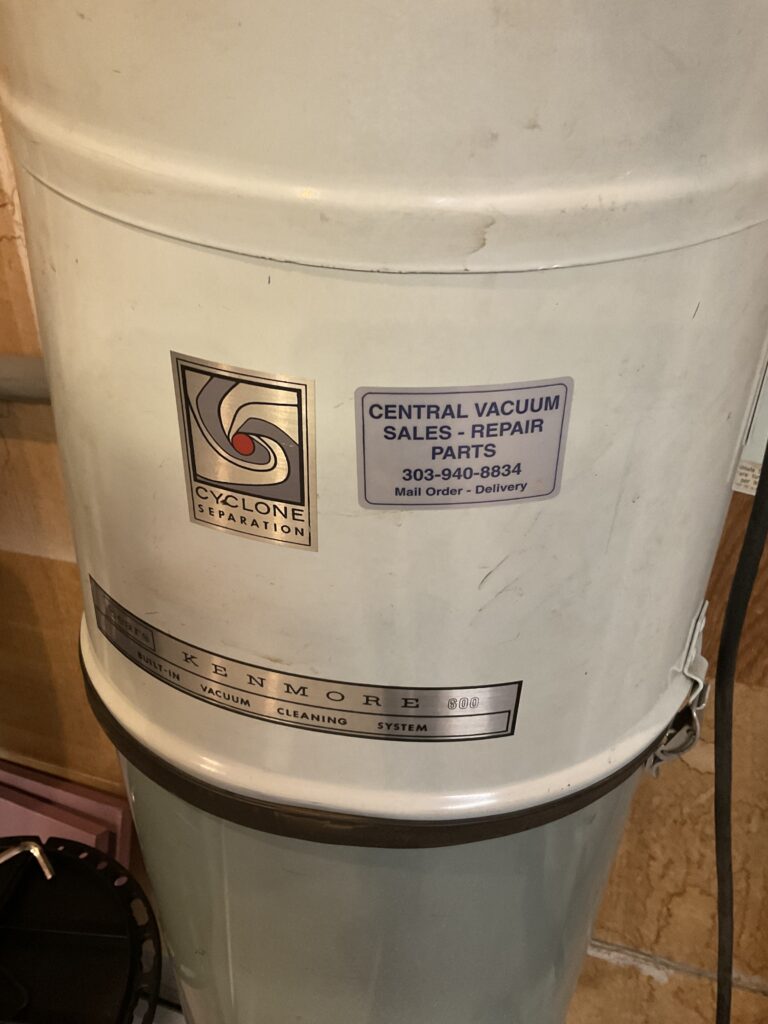
I think the designer chose Helvetica for the Central Vacuum Sales -Repair Parts because they needed their companies name and service offerings to be visible from a distance on their small sticker ad. I think this is effective as it allows me to see where I can get help if my vacuum breaks as I would probably be looking at the system trying to diagnose the problem if it were to stop working. I think their logo is extremely boring though.
I chose the word omnipresent because it reflects the fact that Helvetica is found literally everywhere. In the film, some of the people who criticize Helvetica stated that it was the font of capitalism (though some argued it was socialism as literally anyone could use it). Helvetica is famous for its ability to be neutral, while at the same time, being easy to read. These two characteristics are what makes Helvetica such an easy choice as a font. However, at the same time because everybody uses, it has sort of become bland, and does not have any sort of personality to it. One of the things I found notable about the film, was how they compared a choice of font to someone auditioning for a part in a film. If the film decides to go with the inferior actor for the job, it won’t necessarily prevent people from being able to follow the plot of the movie. They just won’t connect with it in the same way as if they chose the better actor for the job, this is the same situation with font choices. Helvetica will get the job done for being readable but if you want to go the extra mile and communicate something that resonates with someone it’s worth considering other options.
Wood. It’s the first thing you collect in Minecraft to craft a crafting table, which then allows you to craft countless other items. Unfortunately, crafting in real life is not as easy as punching a tree and clicking a button.
The Physical Unknown
My entire life, I have been known as the tech guy. I can confidently say that I can fix any software problem you ask me for help with and I can whip up iOS and Mac apps to solve various problems in no time at all. Digital technological understanding has always been a gift of mine and skills in utilizing digital tools to create and solve problems are skills that I continuously have worked to continue to sharpen. However, using physical tools, crafting, and visualizing 3D structures is something that I am extremely unfamiliar with. When starting this project, I found myself at a total loss of any idea on where and to start. My complete lack of confidence with working with physical goods, using power tools, and subpar hand control made this project extremely difficult for me to begin.
Selecting a shape
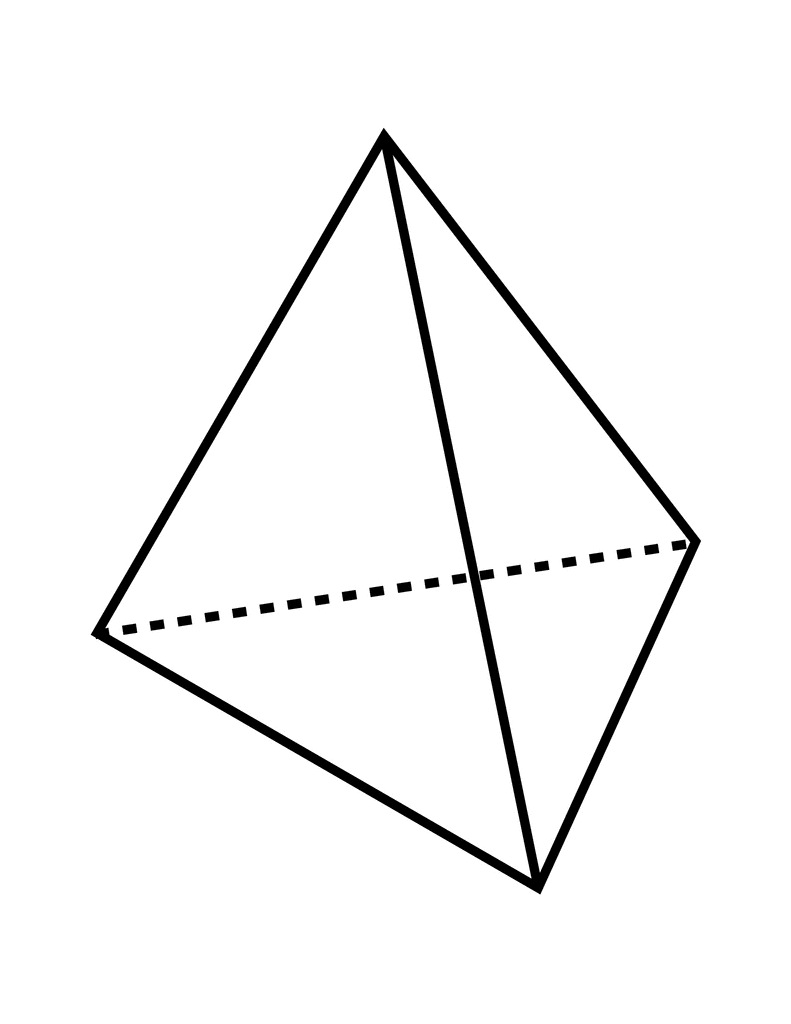
Triangular Pyramid (etc.usf.edu)
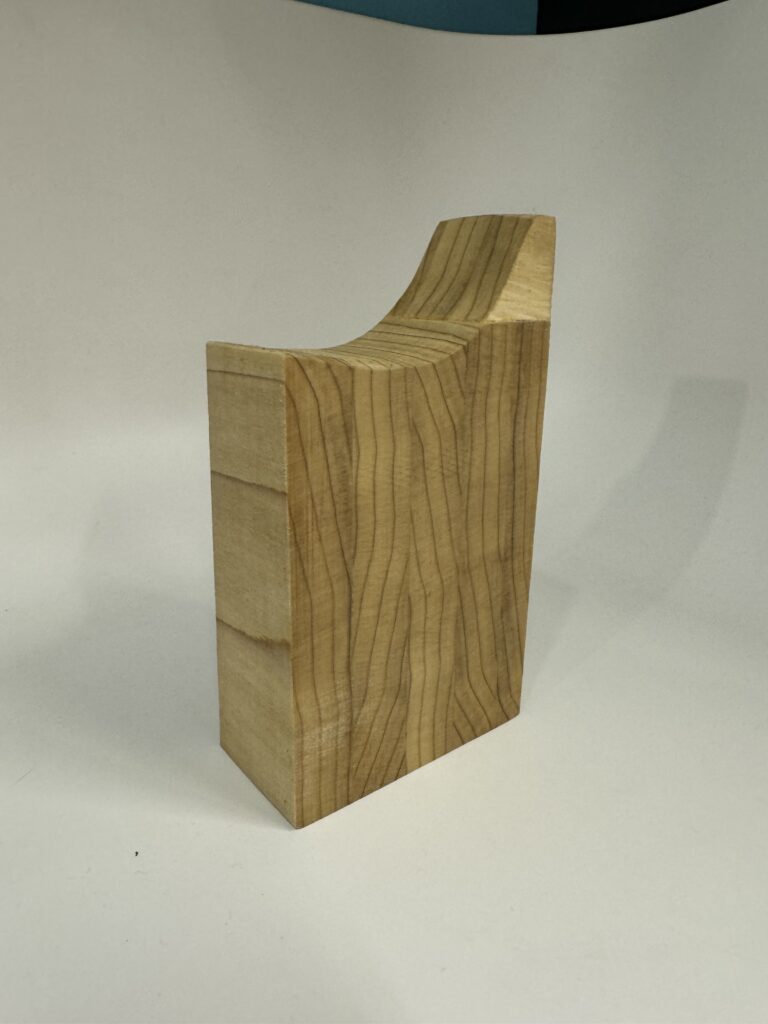
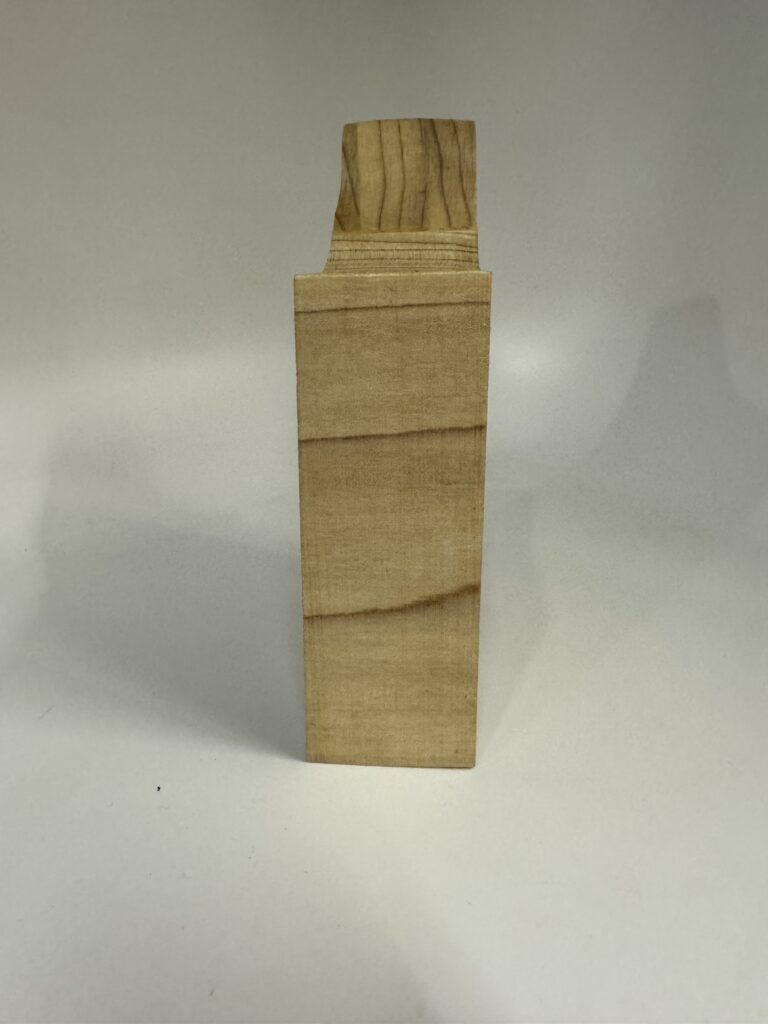
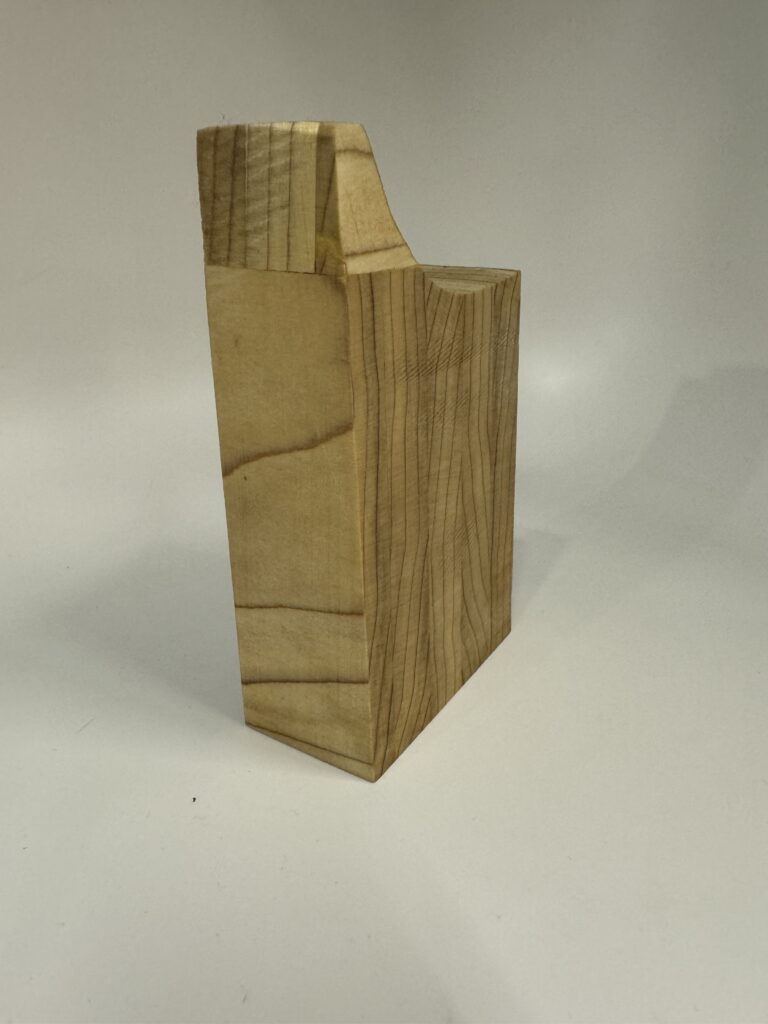
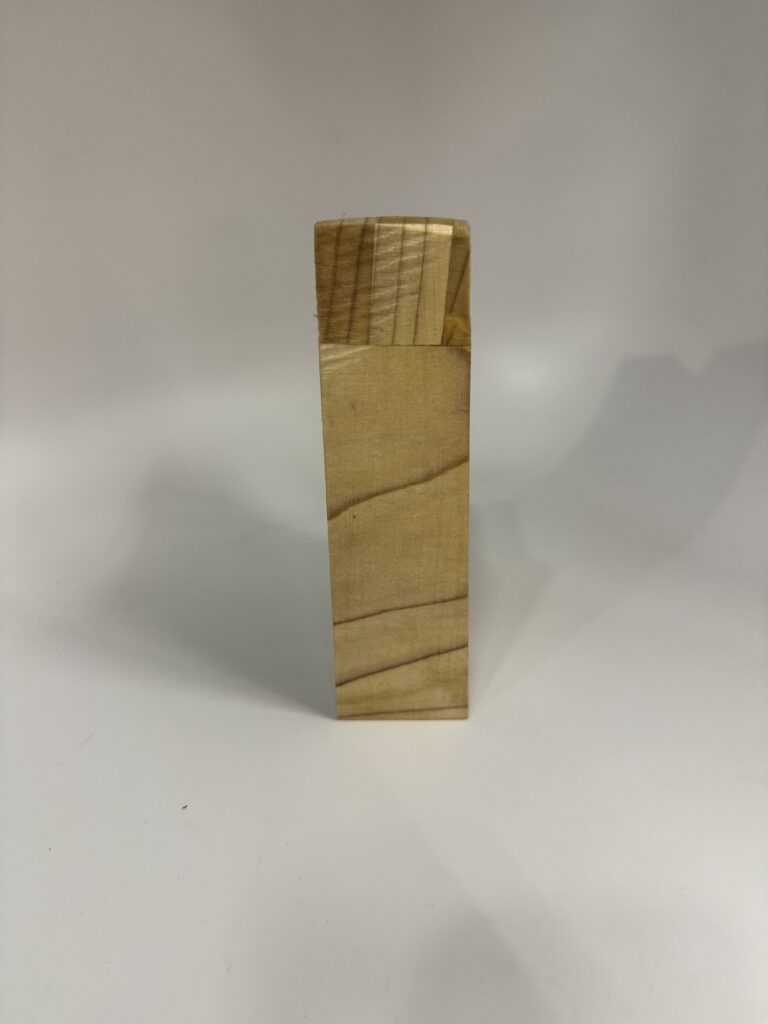
For this project, I was tasked with creating a convex polyhedron from a 0.75″x 5.5″ x 12″ plank of hardwood. I choose to use popler as my hardwood given that it was the only plank type remaining in the lab to my knowledge. I decided I would attempt to create a triangular pyramid consisting of 4 triangles.
Marking the board.
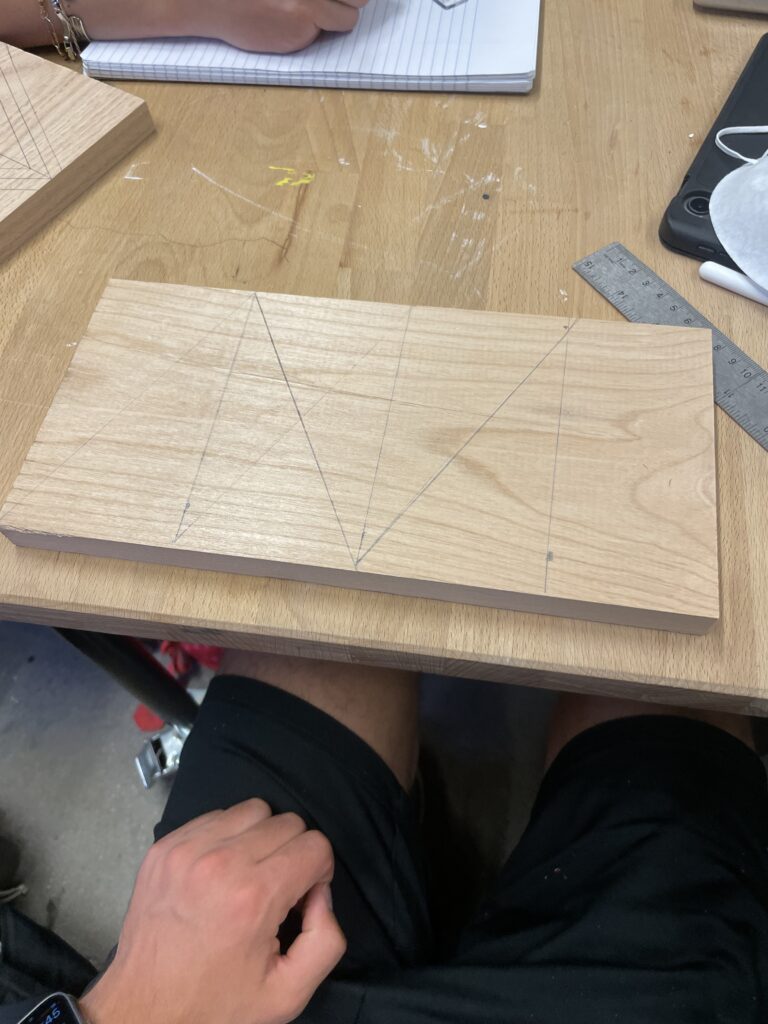
To cut the piece, I drew lines every 3 inches on the board and then drew 3 triangles with pencil to aid in lining the blade for cutting.
Chop till ya drop
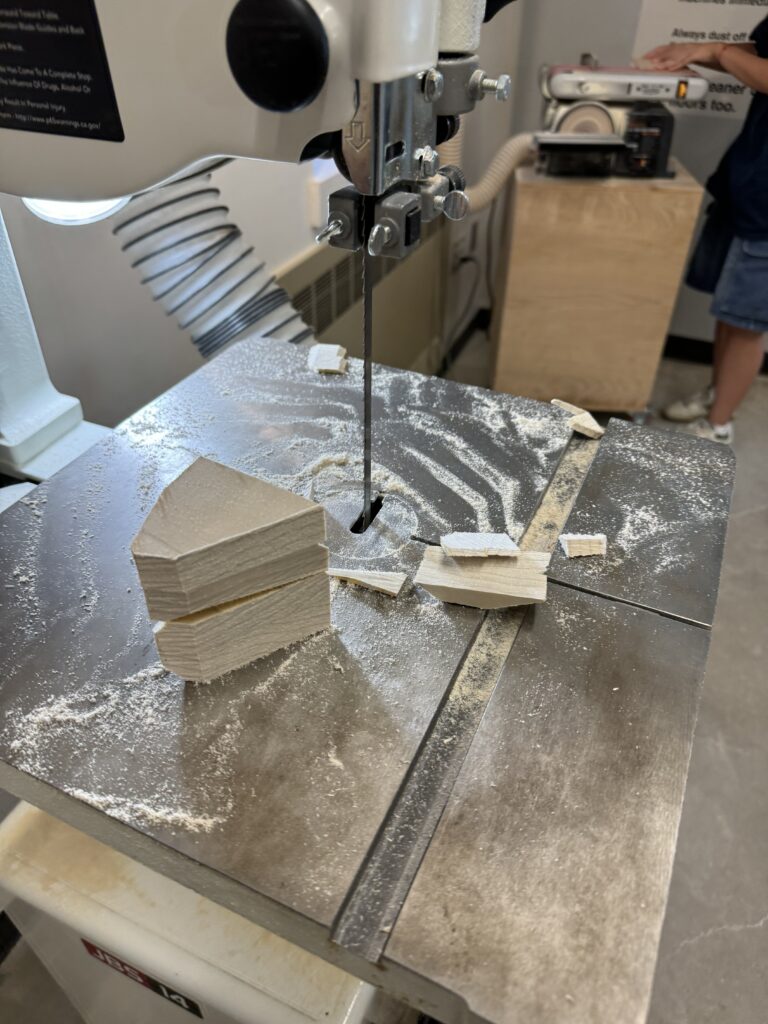
My next step was to cut the triangles. I received advice to cut one triangle and then trace that on the board before cutting more, that way I could eliminate imperfections in my drawing of the lines. I used the band saw to cut the triangles.
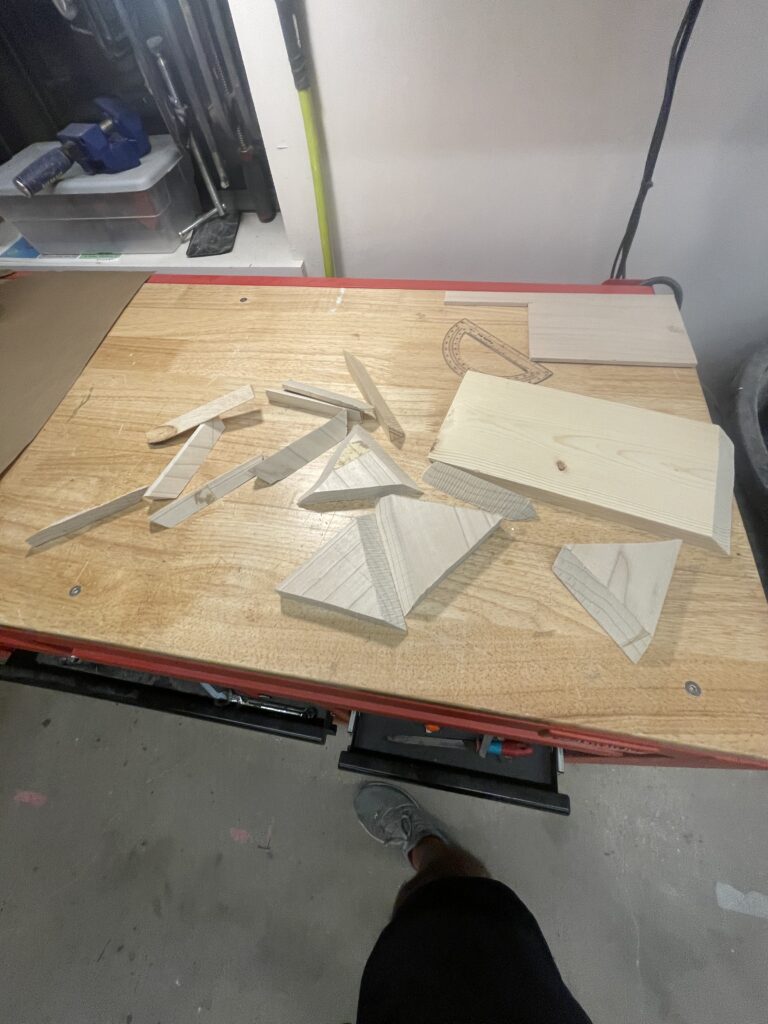
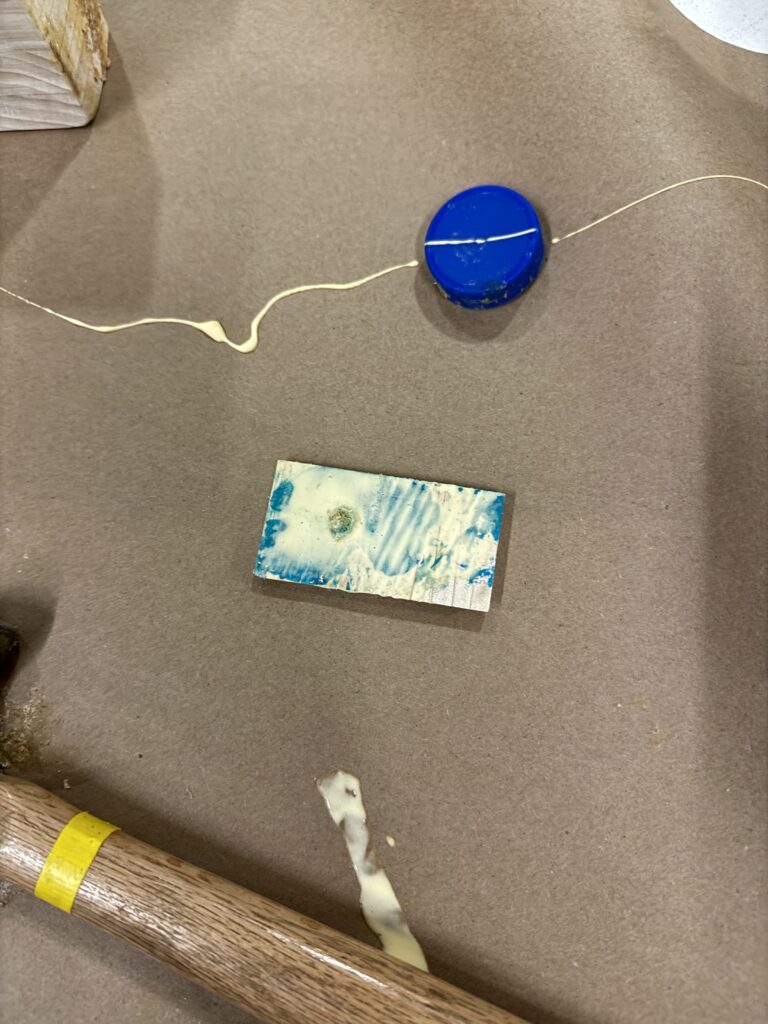
I realized I needed to have angles on the sides of each triangle to be able to connect them together without large gaps. I tried tilting the band saw plate at an angle and was able to get a few good cuts. However, I struggled to cut a perfect straight line every time and messed up drastically on multiple edges. I eventually realized I needed to start over if I was going to do anything that resembled a pyramid.
The failed prototype
Taking a new approach
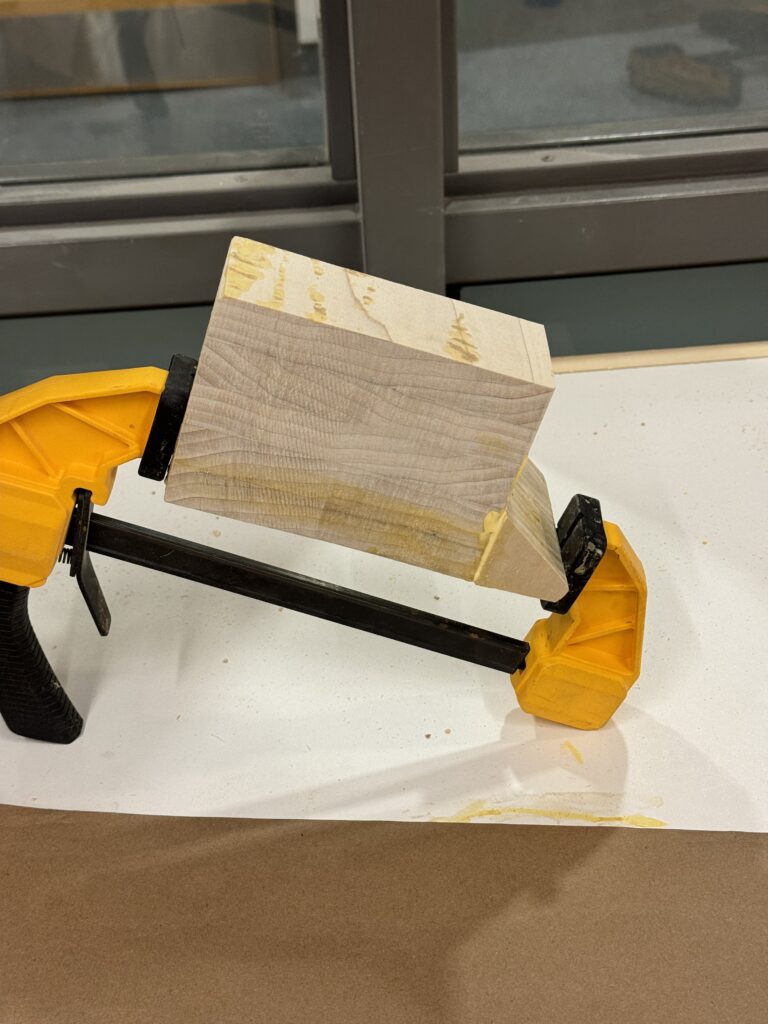
After consulting with the Danny, I was given the suggestion of gluing together the triangle scraps from my failed prototype and “sculpting through subtraction”. This would allow me to avoid the difficulty of measuring and cutting precise angles in the wood to make a shape. I decided that in addition to gluing the scraps together, I would cut a new board into pieces and glue those together, this way I would have a second chance to sculpt a solid if I were to critically mess up.
The glued together scraps.
Saw, Sand, Repeat
Due to the unevenness of the stacked triangles I glued together, I decided that I would utilize the newly glued triangles as my first attempt at sculpting. My goal was to even out the piece so that there were no gaps between the triangles. This meant that I would have to remove all of the excess wood until each triangle was the same size as the smallest triangle I glued together.
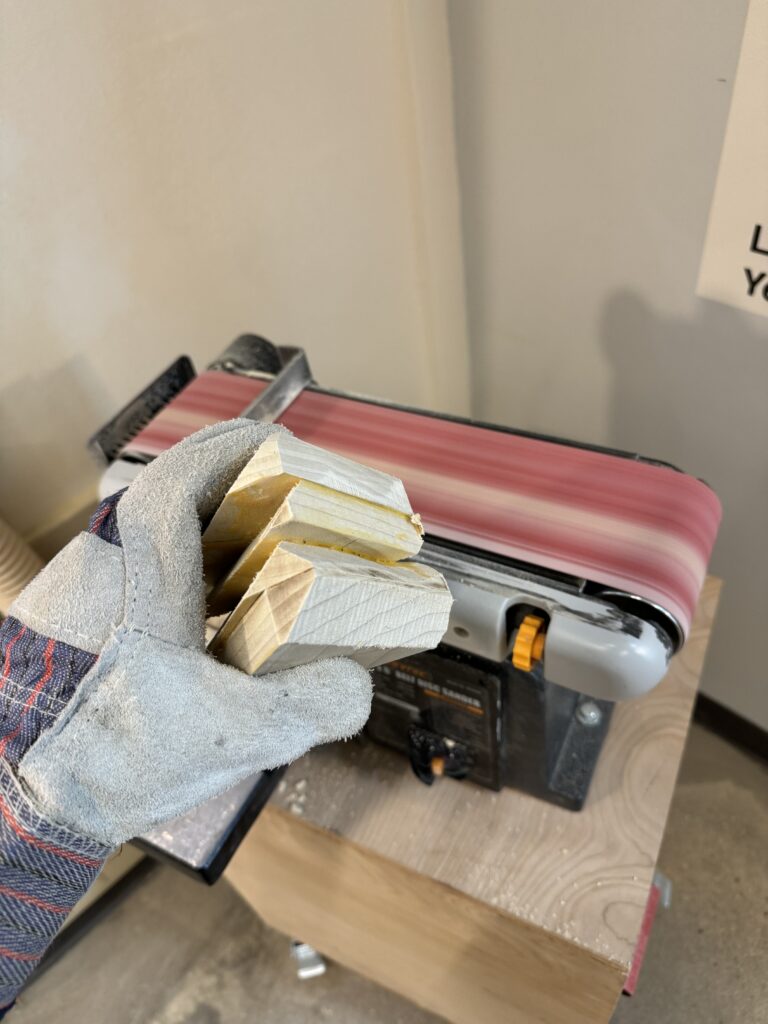
Working on the belt sander
At first, I attempted to utilize the belt sander alone to get the pieces to even out. This was taking an extremely long time, so I decided to use the band saw instead.
Making a triangle with the band saw
With the band saw, I successfully cut the triangle into a singular triangular prism shape with only one crevice. I was then able to sand the remaining crevice off using the belt sander.
Building the other block
Having been satisfied with the triangle shape I was able to make, I decided to try carving the other block I had made by gluing freshly cut rectangular prisms together. I started off by using the band saw to cut the uneven parts of the rectangular prisms as well as any excess glue that remained. To my surprise, I was able to get an extremely smooth wood block that was difficult to determine that it was created through gluing multiple rectangular prisms together.
Combining the two blocks.
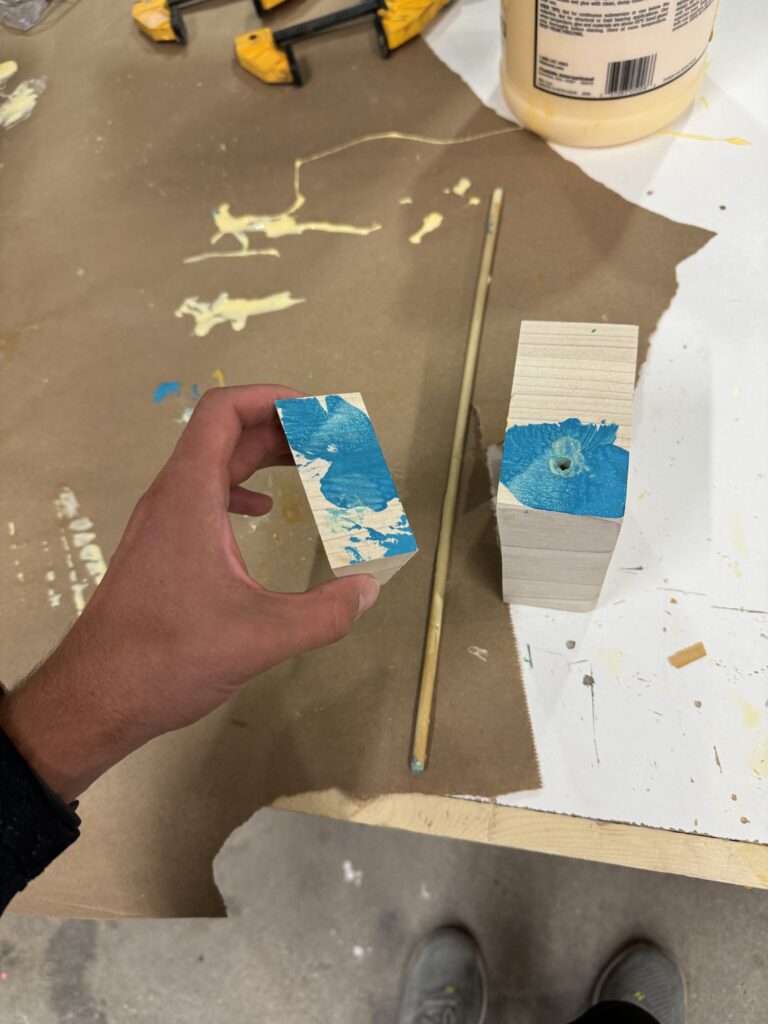
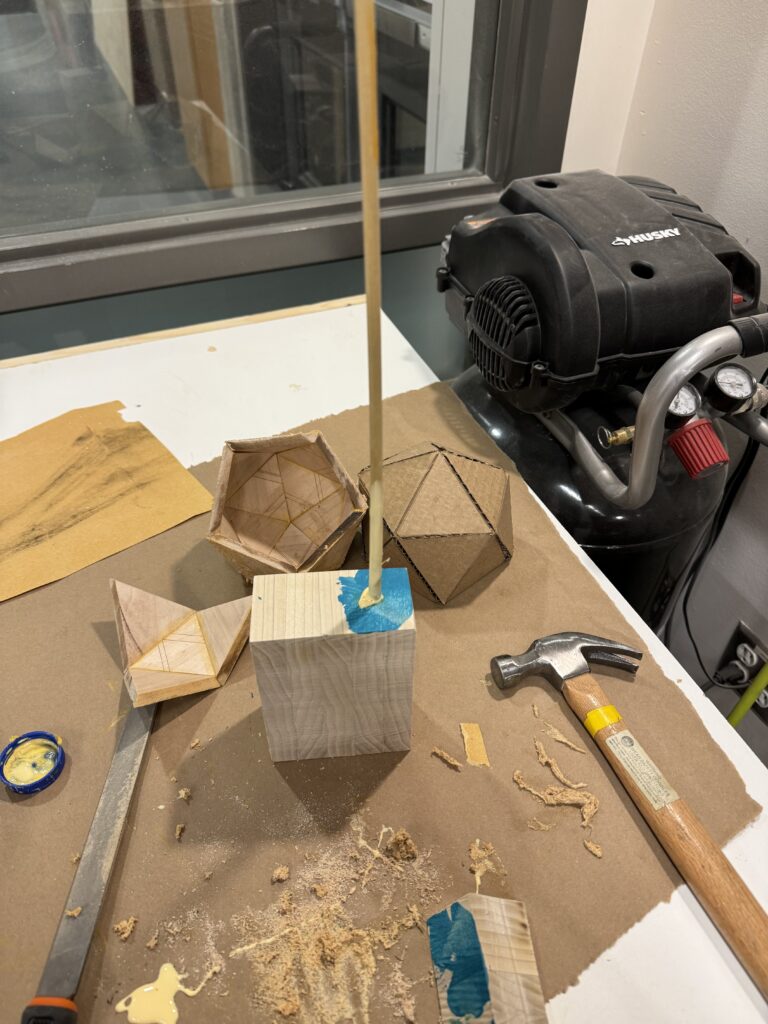
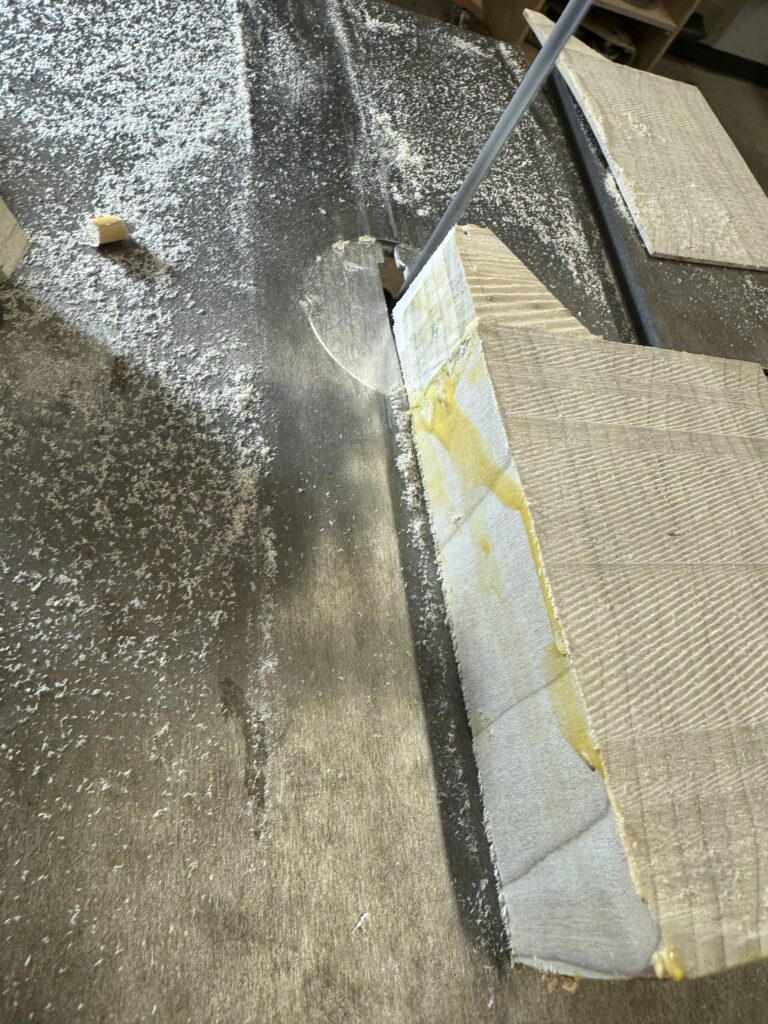
Given that I wanted something more complicated than a thick rectangular prism, I decided I would attempt to connect both the mini triangular prism and the rectangular prism together. To do this, I thought it would be useful to use a dowel joint.
The dowel joint print
I drilled a hole in the larger block and then used a bit of paint to help me figure out where I should drill the hole in the smaller part. Next, I glued the dowel in and hammered it into the larger block before going to cut it. This took quite a bit of hammering.
The dowel in the block
After getting the dowel in, I cut a bit off and drilled the hole in the other smaller triangular prism.
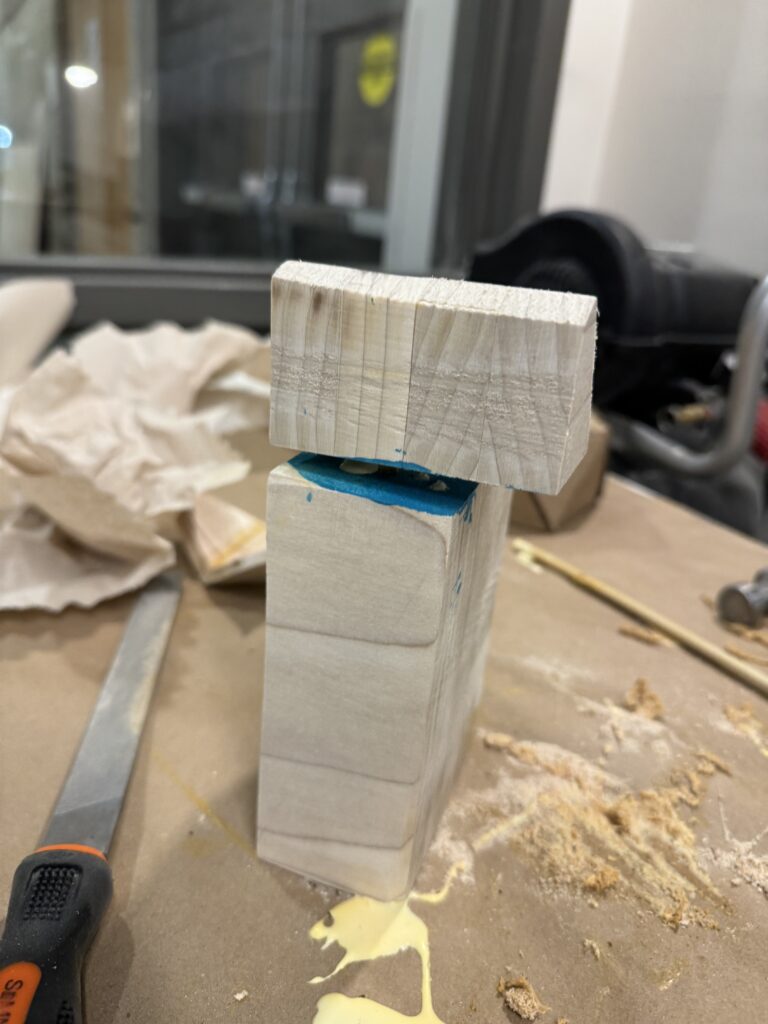
The dowel connection attempt
I then tried to connect the two pieces together. The dowel was hard to get in as I might not have cut deep enough in the smaller piece. After attempting to hammer the pieces together, I was able to get the dowel inside, however there was a gap between the two pieces that I could not seem to close. After hammering some more, I decided I would give up on the dowel joint and just glue the faces together. I removed the dowel and sawed/sanded the areas of the pieces with paint on it.
Death of the dowel Faces of the two parts glued together (and drying).
Trimming and Curving
Now that I had both pieces connected, I sawed off areas that had glue and other imperfections.
Sawing off imperfections
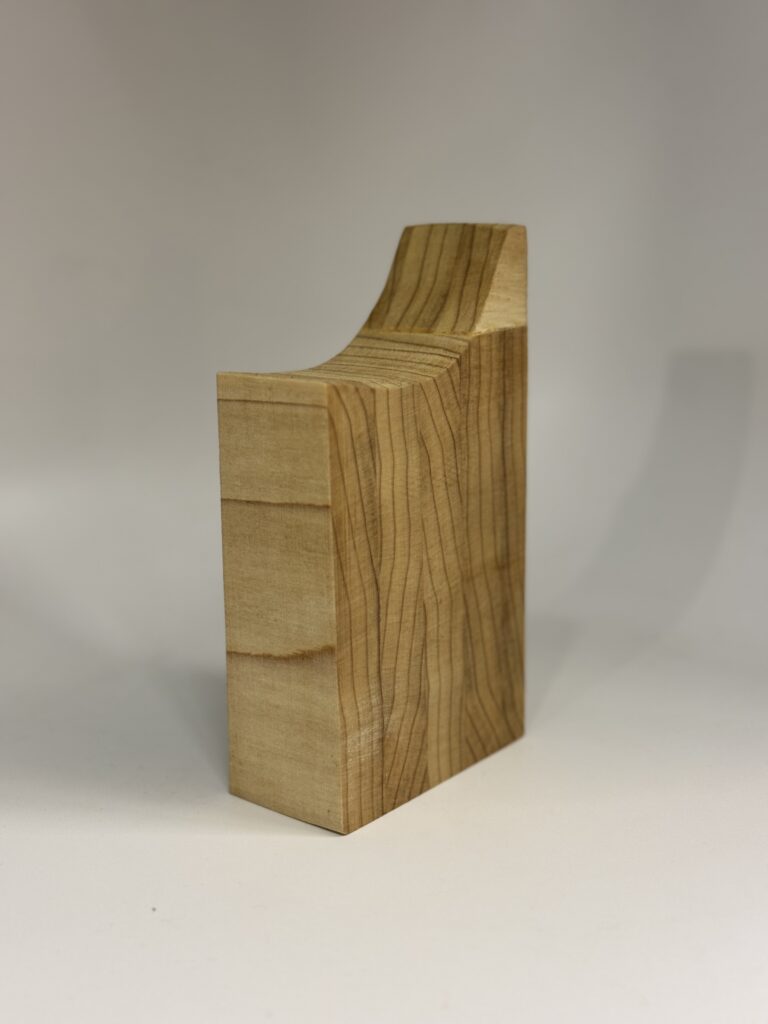
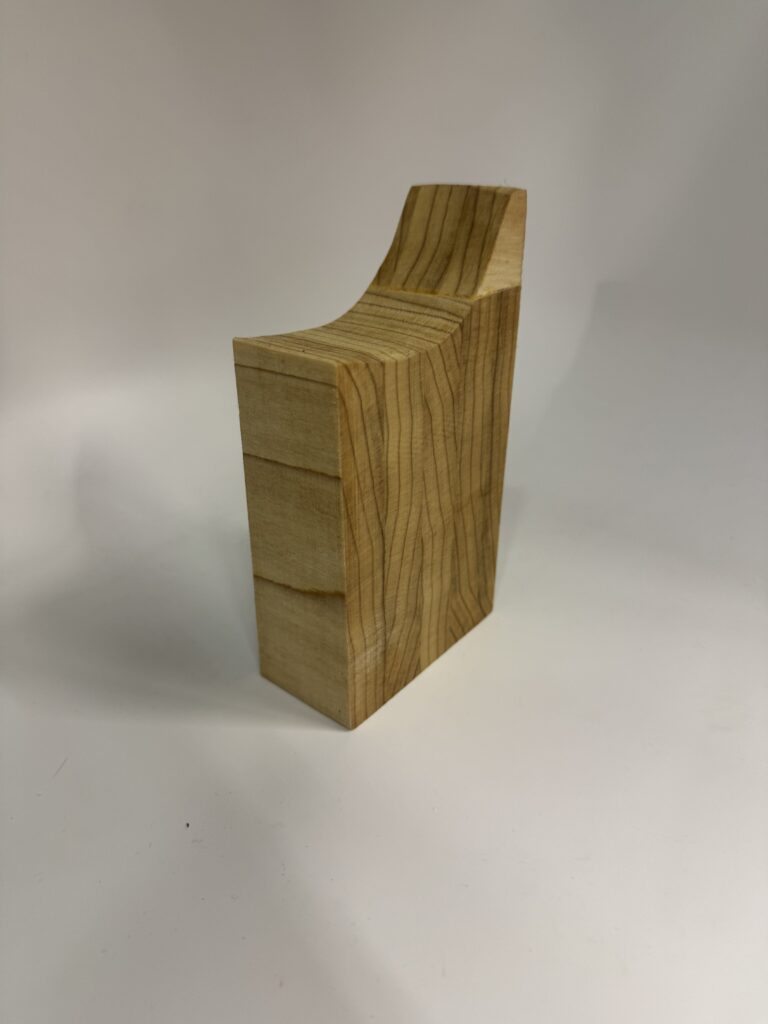
Next was on to sanding, I decided it might be cool if I made the piece have a rounded aspect to it. I ended up using the curved edge of the belt sander to make a unique curve (skateboard ramp like) shape on the block.
I tried to eliminate evidence of the glueing of the two pieces together the best I could through additional sanding. I also used this opportunity to sand all sides of the piece to make it more smooth.
Finishing up
The last step was to add some oil to finish the piece. I added a little bit of what I think was some sort of seed oil (I do not remember the name). I only had time to do one coating, but I was satisfied with the color. The final step was to take some photos of my piece (with my brand new iPhone 15 Pro).
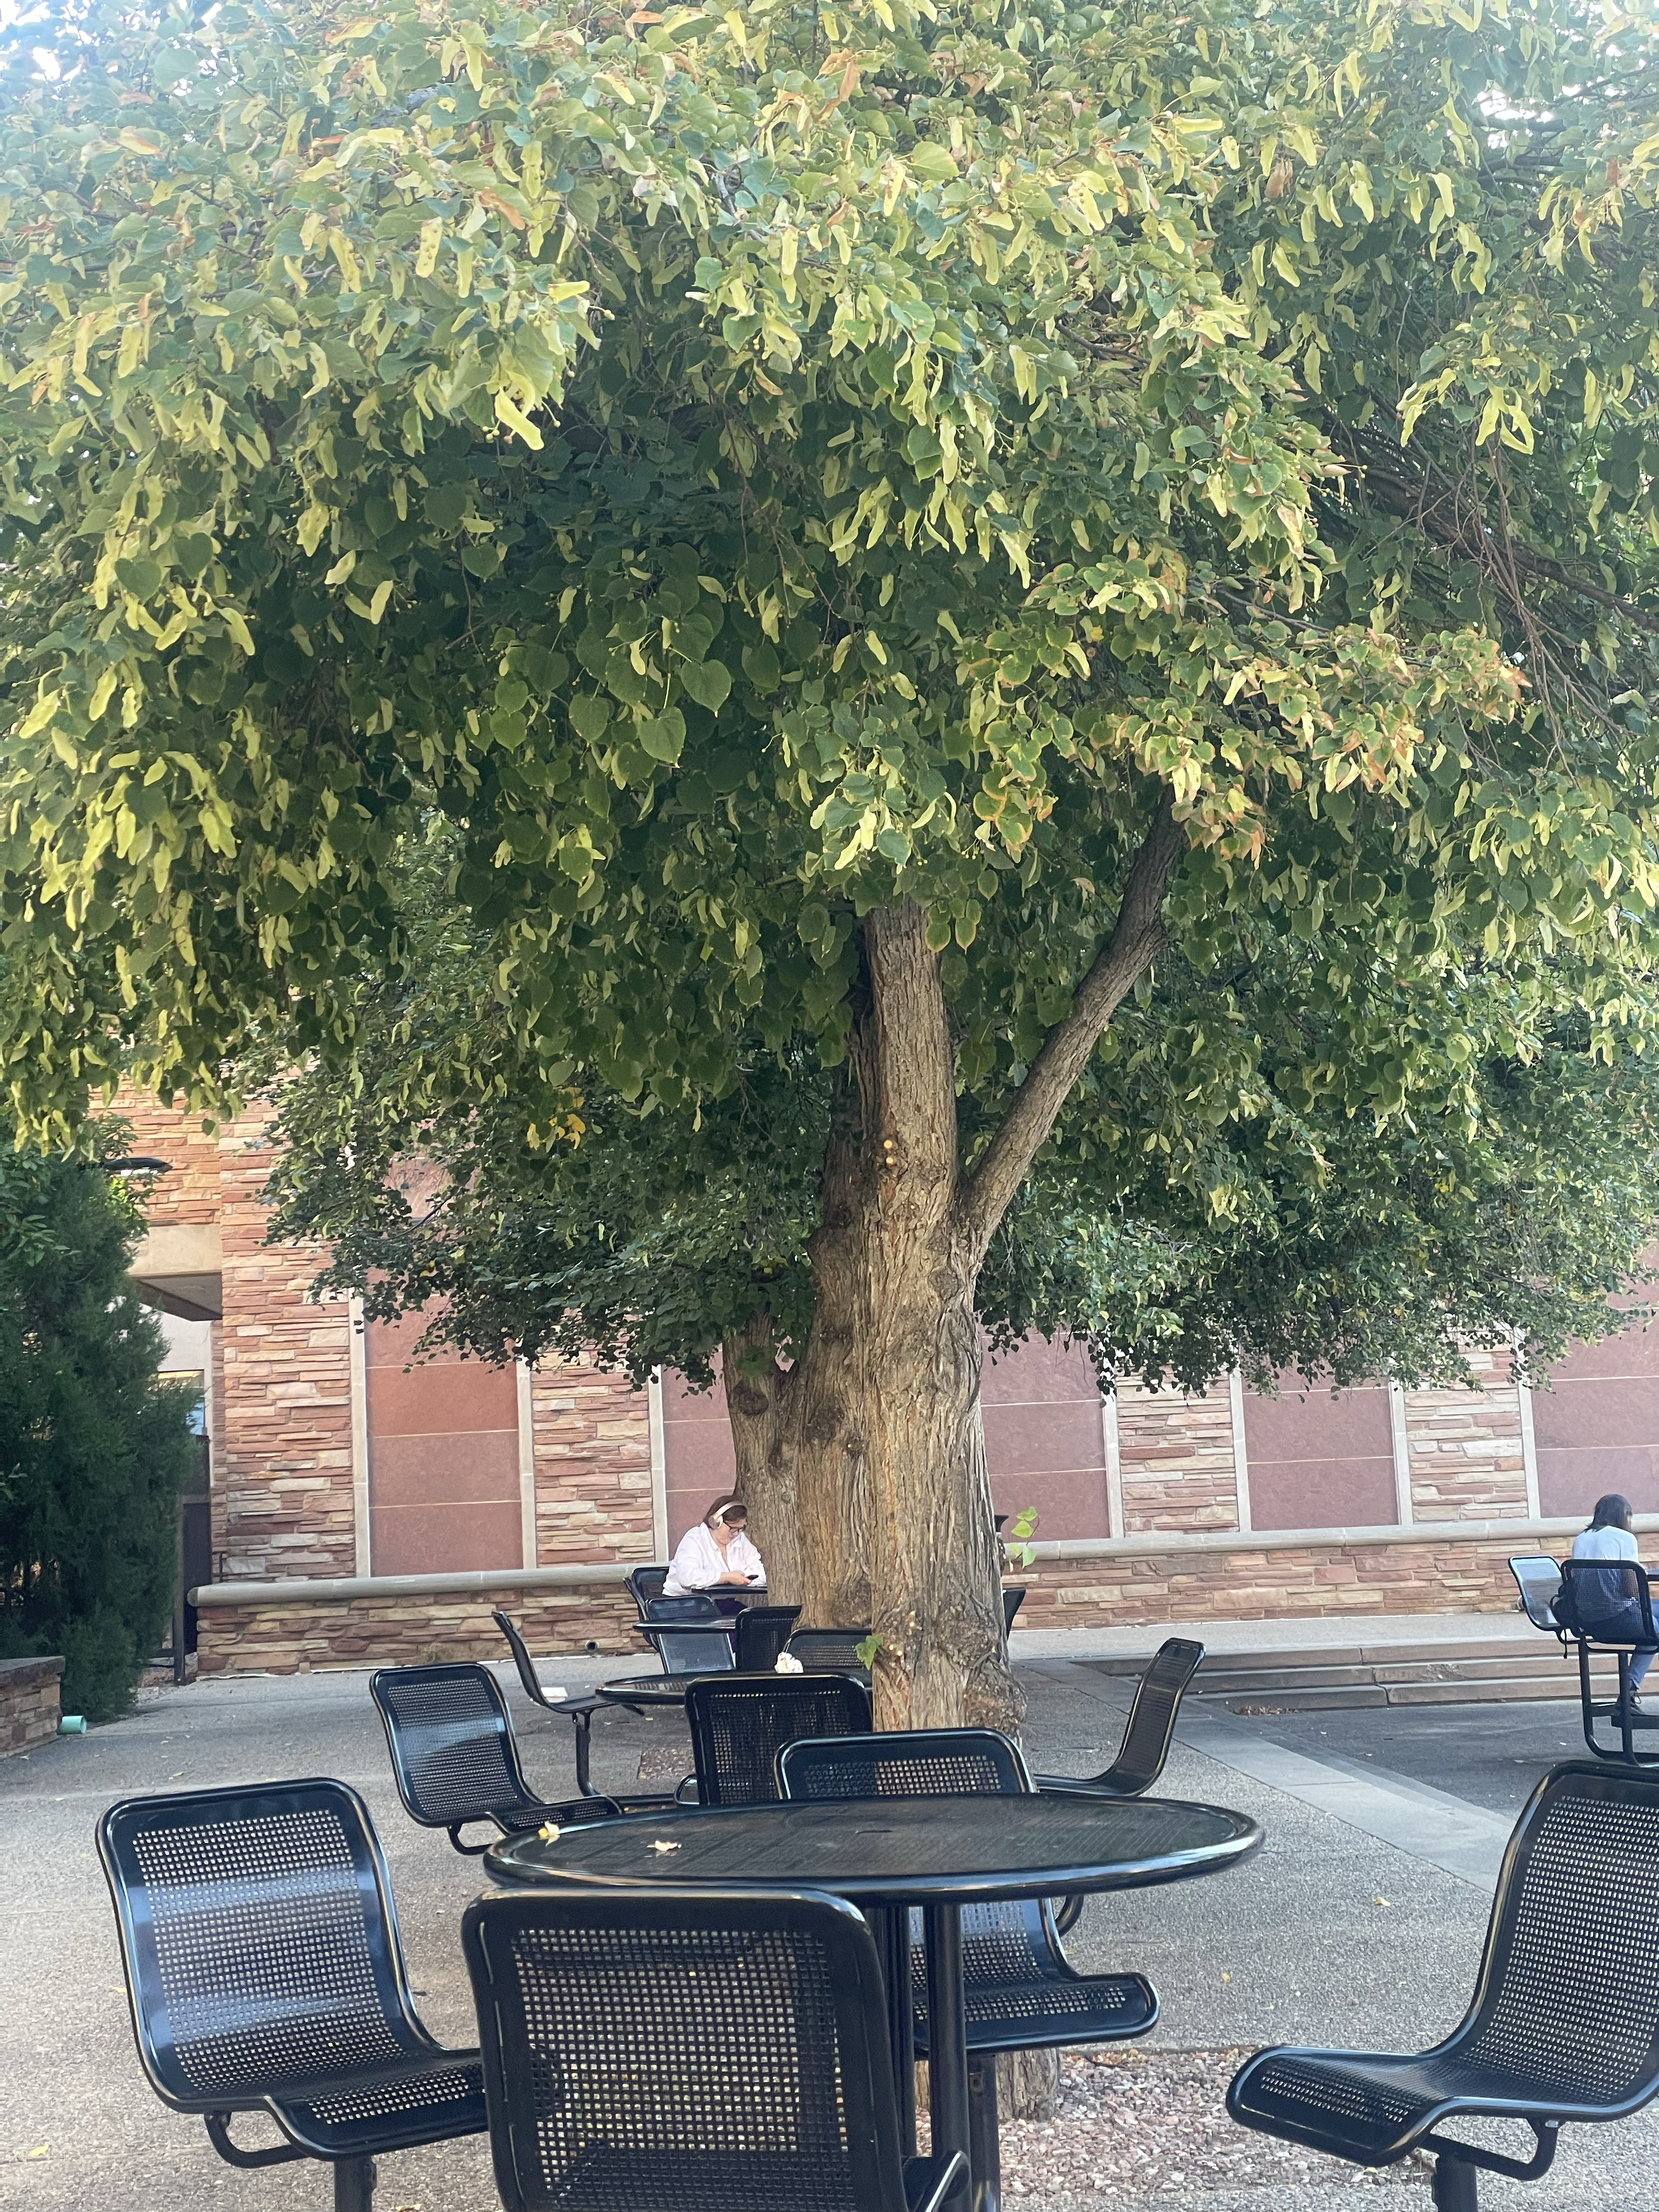
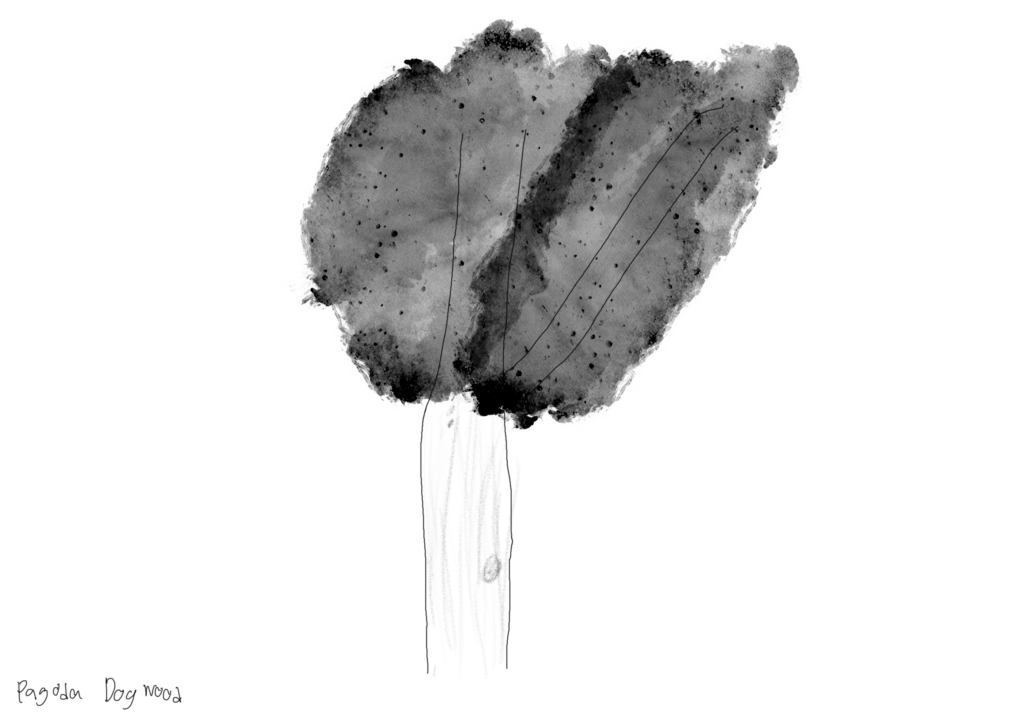
Pagoda Dogwood Tree (Pretty sure unless my map skills are bad) near the UMC My attempt at drawing the tree.
During this sketch session I noticed that the trees were planted in little cutout squares in the ground. I wonder if this was done for aesthetic or to prevent the tree from competing
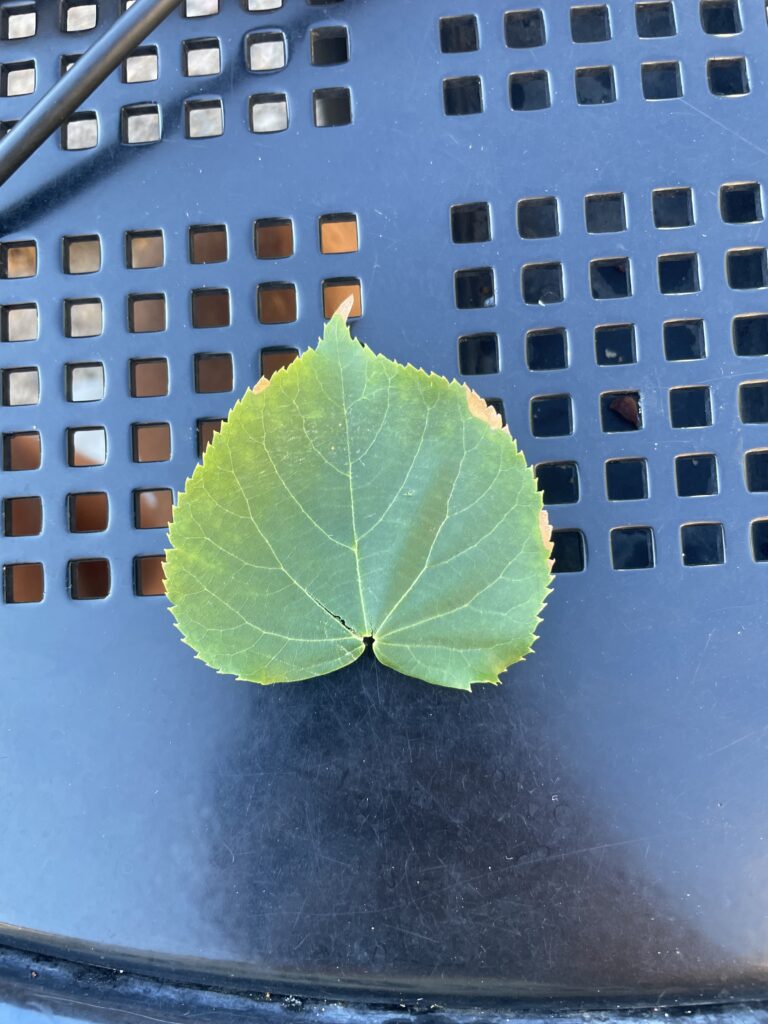
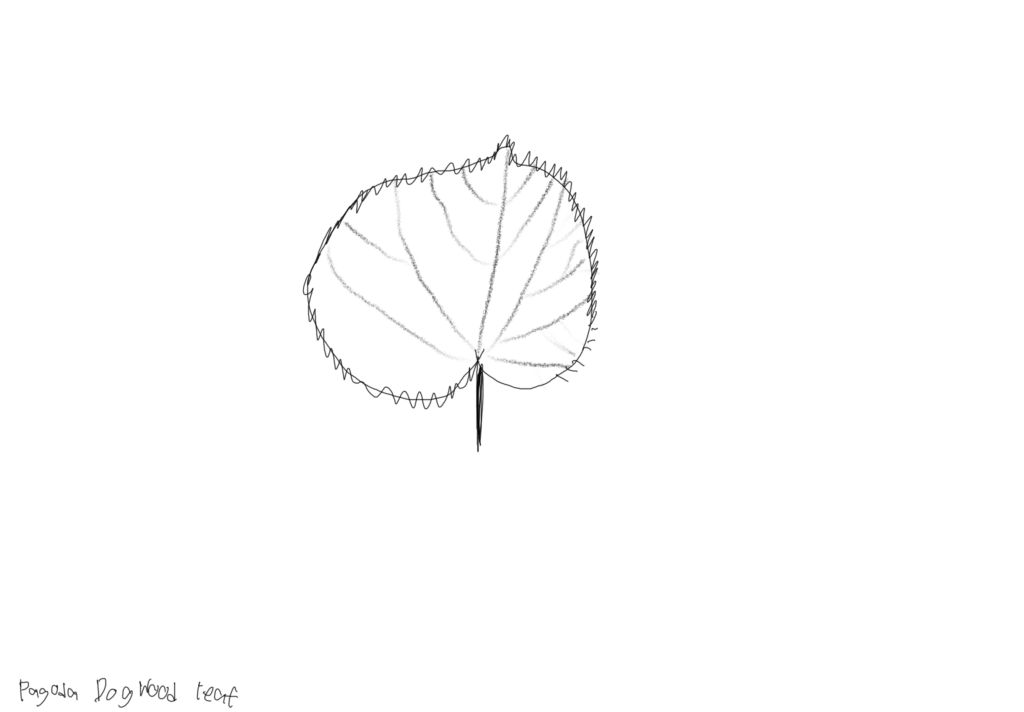
I noticed that some of the leaves seemed to have started to change color a bit. The general leaf structure looked like this:
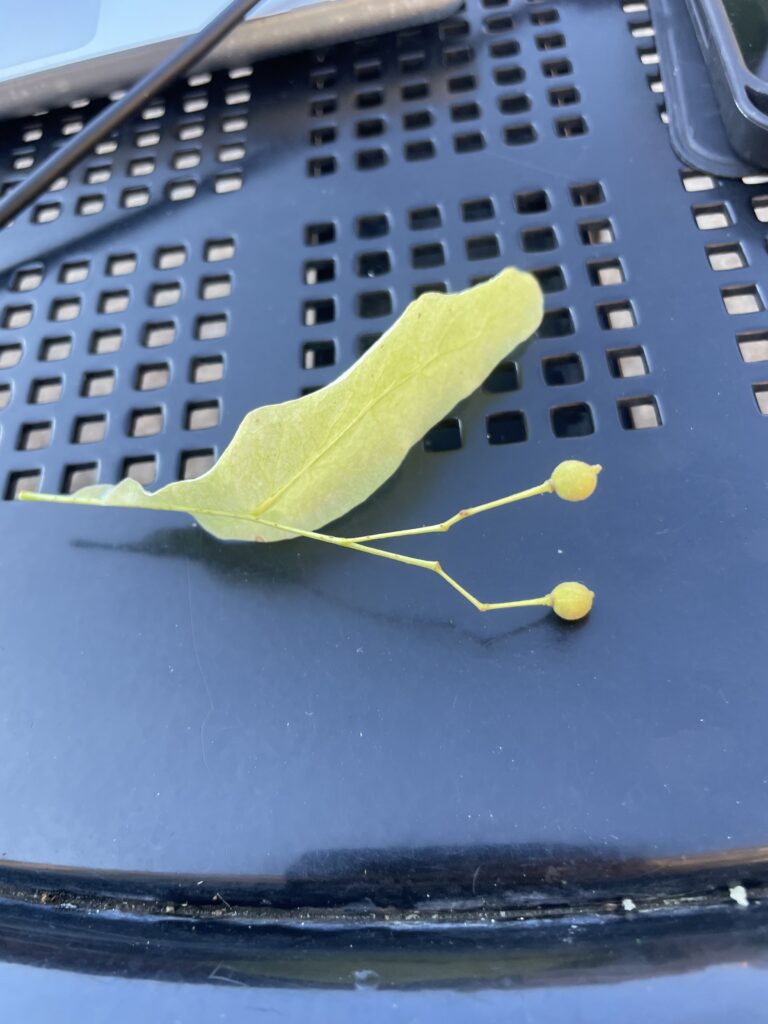
Below was another leaf that was on the tree but less common than the previous leaf type had these little fruit like objects attached.
I wonder what the ratio between these leaf types are.
Prompt: “In our first class session, we discussed our favorite objects. Write a short post (~150-200 words) about what object you chose, why it’s special, and what materials it’s made from. Include at least one photo of the object.”
I chose my laptop as my favorite object. It is a MacBook Pro 2021 with an M1 Pro processor. My Mac is special to me because it allows me to do a lot of creative things such as designing logos, making mobile applications, websites, editing videos and more. My laptop also allows me to conduct tech-support for my friends and family remotely and also be able to play the occasional computer game. I can do my homework assignments, read, write, blog, and watch YouTube videos to expand my knowledge of anything and everything with the power of the internet. The Mac keyboard lets me write significantly faster compared to a phone or tablet so I can get things done with ease. The device is composed of many materials including plastic, aluminum, tin, and gold. It also contains different rare earth elements. With my MacBook in hand, I am an unstoppable force.
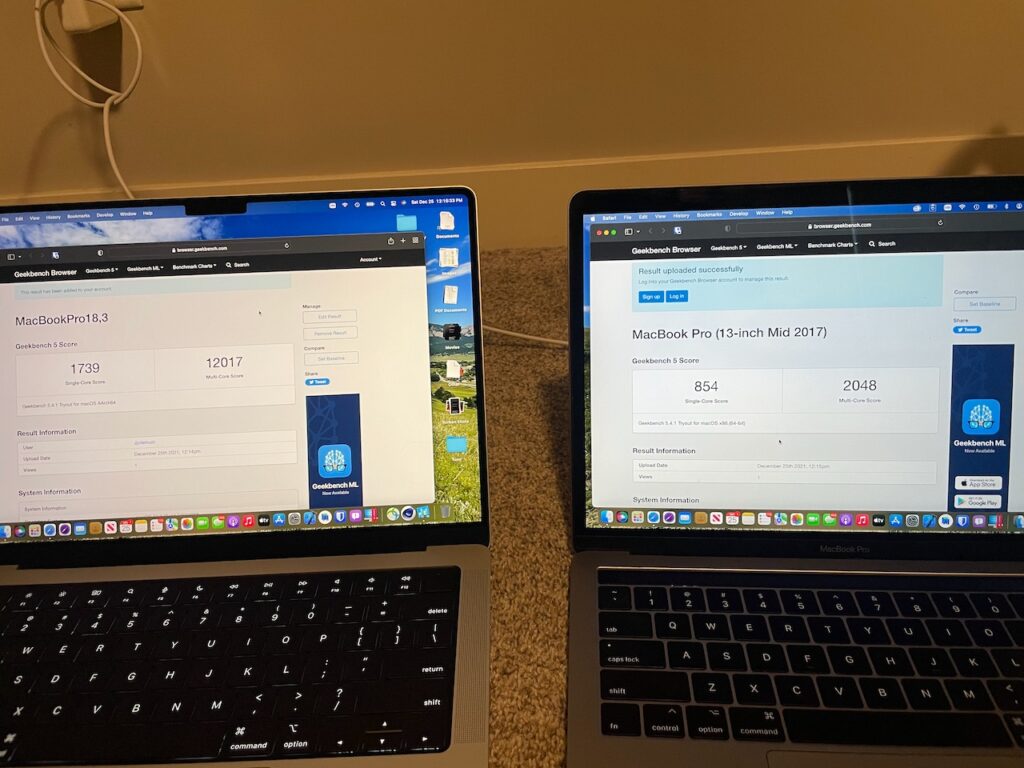
My current MacBook Pro (left) vs. my previous MacBook Pro (right) with GeekBench scores.
NOTE: I am currently working on reorganizing my servers. I want to move some of them to a 3rd party provider while keeping some on site. I will have this blog separated from my other projects soon.